Introduction to RCC for MENG 34200
With your enrollment in the MENG34200 course you have been given access to an education allocation on the Research Computing Center (RCC) Midway compute cluster. Some useful information pertaining to the Midway compute environment is listed below.
Where to go for help
For technical questions (help logging in, etc) send a help request to help@rcc.uchicago.edu
The User Guide is available at http://docs.rcc.uchicago.edu
Logging into Midway
Access to RCC is provided via secure shell (SSH) login.
All users must have a UChicago CNetID to log in to any RCC systems. Your RCC account credentials are your CNetID and password:
Username CNetID Password CNetID password Hostname midway.rcc.uchicago.edu
Note
RCC does not store your CNet password and we are unable to reset your password. If you require password assistance, please contact UChicago IT Services.
Most UNIX-like operating systems (Mac OS X, Linux, etc) provide an SSH utility by default that can be accessed by typing the command ssh in a terminal. To login to Midway from a Linux/Mac computer, open a terminal and at the command line enter:
ssh <username>@midway.rcc.uchicago.edu
Windows users will first need to download an SSH client, such as PuTTY, which will allow you to interact with the remote Unix server. Use the hostname midway.rcc.uchicago.edu and your CNetID username and password to access Midway through PuTTY.
Accessing Software on Midway
When you first log into Midway, you will be entered into a very barebones user environment with minimal software available.
The module system is a script based system used to configure the user environment to make available to the user selected software packages. To access software that is installed on Midway, you use the module system to load the corresponding software module into your environment.
Basic module commands:
Command Description module avail lists all available software modules module avail [name] lists modules matching [name] module load [name] loads the named module module unload [name] unloads the named module module list lists the modules currently loaded for the user
Examples
Obtain a list of the currently loaded modules:
$ module list

Currently Loaded Modulefiles:
 1) vim/7.4         3) emacs/24        5) env/rcc
 2) subversion/1.8  4) git/2.7         6) slurm/current
Obtain a list of all available modules:
$ module avail

-------------------------------- /software/modulefiles ---------------------------------
Minuit2/5.34(default)                               lammps/cuda-9Dec2014+intelmpi-5.0+intel-15.0
Minuit2/5.34+intel-12.1                             lammps/trunk(default)
Minuit2/5.34+intel-15.0                             leveldb/1(default)
...
knitro/9.1.0-z                                      yt/3.0(default)
lammps/10Aug2015+intelmpi-5.0+intel-15.0            yt/3.1
lammps/9Dec2014+intelmpi-5.0+intel-15.0             zlib/1.2(default)
-------------------------------- /etc/modulefiles --------------------------------------
condor/7.8(default)    module-info            slurm/2.4            lurm/current(default)
env/rcc                samba/3.6              slurm/2.5            use.own
-------------------------------- Aliases -----------------------------------------------
-------------------------------- Versions ----------------------------------------------
Load the default python version:
$ module load python

$ python --version
Python 2.7.9
List the currently loaded modules:
$ module list

Currently Loaded Modulefiles:
1) vim/7.4            5) env/rcc            9) netcdf/4.2        13) postgresql/9.2    17) slurm/current
2) subversion/1.8     6) mkl/11.2          10) graphviz/2.28     14) proj/4.8
3) emacs/24           7) texlive/2012      11) qt/4.8            15) gdal/1.11
4) git/2.7            8) hdf5/1.8          12) geos/3.4          16) python/2.7-2015q2
Unload the python module
$ module unload python
The Midway Cluster Environment
Midway is a linux cluster with approximately 10,000 CPU cores and 1.5PB of storage. Midway is a shared resource used by the entire University community. Sharing computational resources creates unique challenges:
- Jobs must be scheduled in a fair manner.
- Resource consumption needs to be accounted.
- Access needs to be controlled.
Thus, a scheduler is used to manage job submissions to the cluster. RCC uses the Slurm resource manager to schedule jobs and provide interactive access to compute nodes.
When you first log into Midway you will be connected to a login node (midway-login1 or midway-login2). Login nodes are not intended to be used for computationally intensive work. Instead, login nodes should be used for managing files, submitting jobs, etc. If you are going to be running a computationally intensive program, you must do this work on a compute node by either obtaining an interactive session or submitting a job through the scheduler. However, you are free to run very short, non-computationally intensive jobs on the login nodes as is often necessary when you are working on and debugging your code. If you are unsure if you job will be computationally intensive (large memory or CPU usage, long running time, etc), get a session on a compute node and work there.
There are two ways to send your work to a Midway compute node:
sinteractive- Request access to a compute node and log into itsbatch- Write a script which defines commands that need to be executed and let SLURM run them on your behalf (This is generally what will be done for this course).
Working interactively on a compute node
To request an interactive session on a compute node use the sinteractive command:
sinteractive
When this command is executed, you will be connected to one of Midway’s compute nodes where you can then go about running your programs. The default disposition of the sinteractive command is to provide you access for 2 hours to a compute node with 1 CPU and 2GB of memory. The sinteractive command provides many more options for configuring your session. For example, if you want to get access to a compute node with 1 CPU and 4GB of memory for 3 hours, use the command:
sinteractive --account=meng34200 --cpus-per-task=1 --mem-per-cpu=4096 --time=03:00:00
It may take up to 60 seconds or more for your interactive session to be initialized (assuming there is an available resource that meets your specified requirements).
Submitting a job to the scheduler
An alternative to working interactively with a compute node is to submit the work you want carried out to the scheduler through an sbatch script. An example sbatch script is shown below:
#!/bin/bash
#SBATCH --job-name=h2o
#SBATCH --output=h2o-%j.out
#SBATCH --error=h2o-%j.err
#SBATCH --time=0:10:00
#SBATCH --account=meng34200
#SBATCH --partition=sandyb
#SBATCH --ntasks-per-node=16
#SBATCH --nodes=1

# set your file prefix
file=h2o
input="$file.i"
output="$file.r"
# load your modules here
module load qbox

# execute your tasks here
mpirun -n 16 qb < $input > $output
SBATCH scripts contain two major elements. After the #!/bin/bash line, a series of #SBATCH parameters are defined. These are read by the scheduler, SLURM, and relay information about what specific hardware is required to execute the job, how long that hardware is required, and where the output and error (stdout and stderr streams) should be written to. If resources are available the job may start less than one second following submission. When the queue is busy and the resource request is substantial the job may be placed in line with other jobs awaiting execution.
The %j wildcard included in the output and error file names will cause Slurm to append a unique number to the end of each file. This will prevent your output and error files from being over written if this script is run multiple times in the same directory.
The second major element of an sbatch script is the user defined commands. When the resource request is granted the script is executed just as if it were run interactively (i.e. if you had typed in the commands one after the next at the command line).
Sbatch scripts execute in the directory from which they were submitted. In the above example, we are assuming that this script is located in the same directory where myScript.py is located.
Interact With Your Submitted Jobs
Submitted jobs status is viewable and alterable by several means. The primary slurm command squeue allows the user to monitor jobs.
For example if one simply runs squeue without any options, a list of all pending jobs on Midway will be shown followed by all running jobs.
squeue

JOBID PARTITION     NAME     USER ST       TIME  NODES NODELIST(REASON)
18572274    sandyb  west-te  mgovoni PD       0:00     48 (Resources)
18570549   gagalli    water    rozsa PD       0:00      1 (Resources)
18570573      ivyb      run  jhskone PD       0:00      1 (Priority)
18571969    sandyb     lmp- mpulighe PD       0:00      2 (Resources)
18572076    sandyb  qb_test  agaiduk PD       0:00      2 (Priority)
18571537    sandyb west-te-  gagalli PD       0:00      8 (Resources)
18572094    sandyb meng3420 rlmcavoy PD       0:00      4 (Priority)
...
...
18563596    sandyb conv_L11  semenov  R 1-07:46:58      4 midway[305,469-471]
18563595    sandyb conv_L10  semenov  R 1-07:49:00      4 midway[384,407,472-473]
18563594    sandyb conv_L9_  semenov  R 1-07:52:00      4 midway[350,367,369,468]
18568833    sandyb est_03_3 ericjsle  R    9:03:46     14 midway[106,216,318,326-327,382-383,413,426,428-430,447,462]
18568683    sandyb     test  mgovoni  R    9:35:27     16 midway[199,212,252,352,365,370,403,417,423-424,436,442,444,449,463,508]
18561060   gagalli  wv_si_b     mahe  R   10:40:09     16 midway[680-695]
18554967   gagalli  par2.sh    rozsa  R    6:32:35      4 midway[710-713]
The above tells us:
Name Description JOBID Job ID #, unique reference number for each job PARTITION Type of node job is running/will run on NAME Name for the job, defaults to slurm-JobID USER User who submitted job ST State of the job TIME Time used by the job in D-HH:MM:SS NODES Number of Nodes consumed NODELIST(REASON) List of Nodes consumed, or reason the job has not started running
As there are usually a very large number of jobs in the queue, the output of squeue must often be filtered to show you only specific jobs that are of interest to you. To view only the jobs that you have submitted use the command:
squeue -u $USER
If one wants to have further control over what is displayed in the output fields, use the -O flag. For example:
squeue -u $USER -O jobid,partition,state,name,reason,prioritylong
JOBID         PARTITION         STATE           NAME            REASON          PRIORITY
18572274      sandyb              PD          west-te        (Resources)          143035
18570573        ivyb            RUNNING          test              None           100119
To cancel a job that you have submitted, first obtain the job’s JobID number by using the squeue -u $USER command. Then issue the command:
scancel <JobID>
or you can cancel ALL of your jobs at the same time (be sure you really want to do this!) with the command:
scancel -u <yourCNetID>
Accessing and Transferring Files
RCC provides a number of methods for transferring data in/out of Midway. For relatively small amounts of data, we recommend the scp command. For non-trivial file transfers, we recommend using Globus Online for fast, secure and reliable transfers. When working on the UChicago network it is also possible to mount the Midway file systems using Samba.
Command Line - SCP
Most UNIX-like operating systems (Mac OS X, Linux, etc) provide a scp command which can be accessed from the command line. To transfer files from your local computer to your home directory on Midway, open a terminal window and issue the command:
Single files: $ scp file1 ... <CNetID@>midway.rcc.uchicago.edu:
Directories:  $ scp -r dir1 ... <CNetID@>midway.rcc.uchicago.edu:
When prompted, enter your CNet password.
Windows users will need to download an SCP client such as WinSCP that provides a GUI interface for transferring files via scp.
Windows GUI - WinSCP
WinSCP is a scp client software that can be used to move files to and from Midway and a Windows machine. WinSCP can be obtained from http://www.winscp.net.
Use the hostname midway.rcc.uchicago.edu and your CNet credentials when connecting.
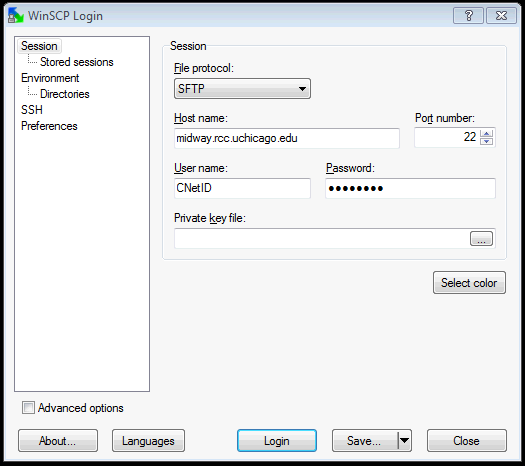
If prompted to accept the server’s host key, select “yes.”
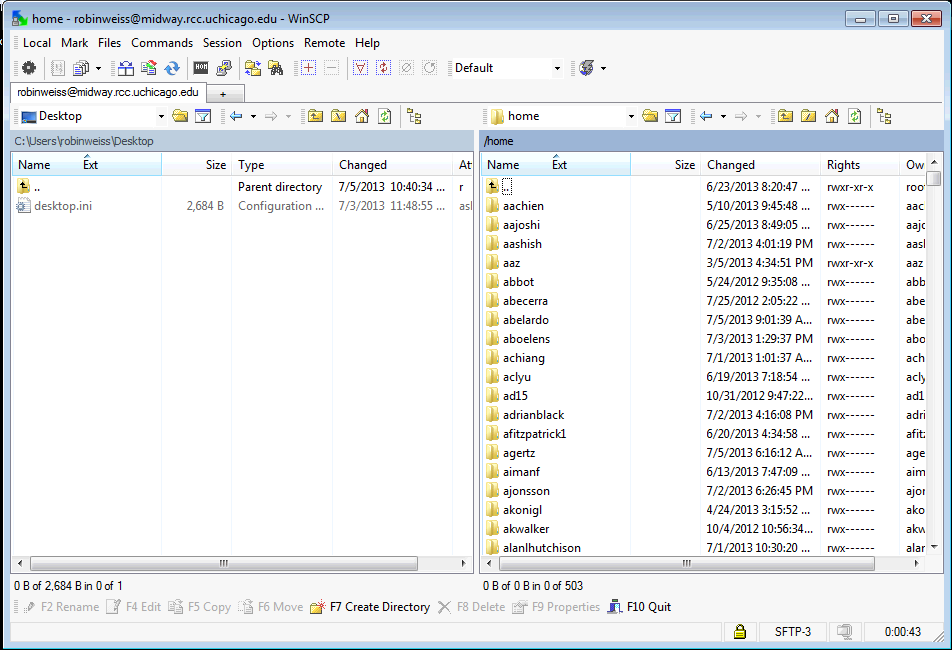
The main WinSCP window allows you to move files from your local machine (left side) to Midway (right side).
Mac GUI - SFTP Clients
There are a number of graphical SFTP clients available for Mac. FileZilla for example is a freely available SFTP client (https://filezilla-project.org/).
Use the hostname midway.rcc.uchicago.edu and your CNet credentials when connecting.
Samba
Samba allows uses to connect to (or “mount”) their home directory on their local computer so that the file system on Midway appears as if it were directly connected to the local machine. This method of accessing your RCC home and project space is only available from within the UChicago campus network. From off-campus you will need to connect through the UChicago virtual private network.
Your Samba account credentials are your CNetID and password:
Username: ADLOCAL\<CNetID>
Password: CNet password
Hostname: midwaysmb.rcc.uchicago.edu
Note
Make sure to prefix your username with ADLOCAL\
On a Windows computer, use the “Map Network Drive” functionality and the following UNC paths:
Home:    \\midwaysmb.rcc.uchicago.edu\homes
Project: \\midwaysmb.rcc.uchicago.edu\project
On a Mac OS X, use these URLs to connect:
Home:    smb://midwaysmb.rcc.uchicago.edu/homes
Project: smb://midwaysmb.rcc.uchicago.edu/project
To connect on a Mac OS X computer:
- Use the Connect to Server utility in Finder
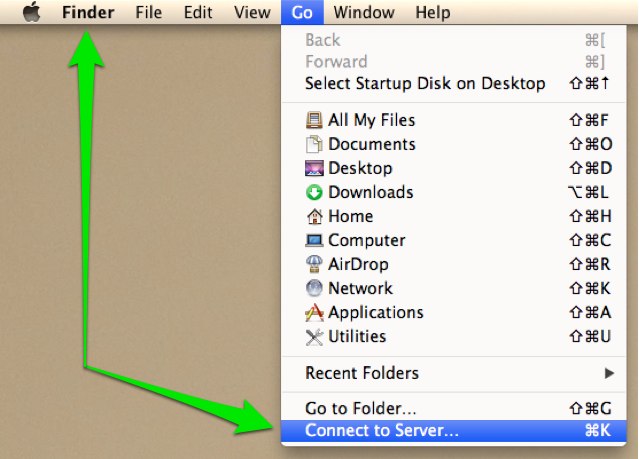
- Enter one of the URLs from above in the input box for Server Address.
- When prompted for a username and password, select Registered User.
- Enter
ADLOCAL\YourCNetIDfor the username and enter your CNet password.