The latest version of this tutorial is viewable at:
http://dev.parallel.works:8999/tutorial.html
The slides for the tutorial are available here:
http://users.rcc.uchicago.edu/~wilde/Swift_VSchool_Worlkflow_Tutorial.2016.0810.pdf
System resources for Virtual School Hands-on Exercises
We will use two systems for the exercises below: the XSEDE resource "bridges" at PSC and Blue Waters at NCSA. You should have obtained login and password credentials for each of these.
We’ll start on bridges, and then replicate a few of the exercises on Blue Waters.
To login to bridges and set up your environment:
$ ssh train001@login.xsede.org
password:

$ gsissh bridges
Then wget the tutorial material to your home directory:
$ mkdir swift
$ cd swift
$ wget http://users.rcc.uchicago.edu/~yadunand/swift-tutorial.tgz
$ tar -xzf swift-tutorial.tgz
We’ll use this material below, for most of the tutorial,
As a final exercise, we’ll demonstrate running a workflow on Blue Waters.
When you reach that section, to login to Blue Waters, ssh to a special login host on that system using the host name, login and password that you were given:
$ ssh tra234@bwbay.ncsa.illinois.edu
$ mkdir swift
$ cd swift
$ wget http://users.rcc.uchicago.edu/~yadunand/swift-tutorial.tgz
$ tar -xzf swift-tutorial.tgz
Introduction: What is Parallel Scripting?
Swift is a simple scripting language that can run many copies of ordinary application programs (apps) on local or remote resources.
"Resources" can include your local computer (desktop,laptop, login host), distributed computers (grid, cloud), and parallel computers (cluster, HPC). Swift can use the resources you give it to run the copies at the same time (in parallel).
A key part of most Swift scripts is the parallel loop statement
foreach, which looks like this:
foreach protein, i in proteinList {
  output[i] = runSimulation(protein);
}
Swift acts like a high-level structured "shell" language. A Swift script just says what needs to be done: what are the apps, what are their inputs and outputs, and in what pattern should they be run. Swift then determines what can run in parallel, what can run when, and what can run where.
Programs run as soon as their inputs are available. They run on the resources you provide. And they run in parallel if possible, based on when the data they depend on is available. This makes Swift scripts very portable. The same script can run on a laptop, a cloud, or a collection of HPC systems, with little or no change.
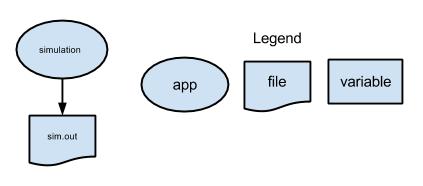
The way in which Swift runs applications on local and remote resources is shown in the figure below.

In this tutorial, you’ll first try a few Swift examples (scripts 1-3)
on a local login host (workflow.iu.xsede.org), to get a sense of the
language.
Then, in example scripts 4-6 you’ll run similar workflows on XSEDE resources and see how more complex workflows can be expressed with Swift scripts.
Setup the swift-tutorial
Copy the tutorial repository from a global folder:
cp -R /opt/tutorials/swift-tutorial .
cd swift-tutorial
Now, run the tutorial setup script:
source setup.sh # NOTE: You must run this with "source" !This adds the example applications simulate and stats
(explained in the next part) and some other functionalities to
your local $PATH for you to run the tutorial. It also adds the
Swift installation on the workflow.iu.xsede.org machine to your PATH.
|
|
You can also obtain the tutorial repository from github, to run on other machines or to get updates if they are needed during the tutorial: |
git clone https://github.com/swift-lang/xsede-tutorial.git swift-tutorial
cd swift-tutorial
Tutorial Section One
This section will show you how to run a science application under
Swift on your local login host (workflow.iu.xsede.org). We use
trivial "mock" simulation and analysis applications to represent
typical scientific programs.
Example 1: Run a single application under Swift
The first Swift script, p1.swift, runs one instance of the mock
application simulate, which generates a single random number and
writes that number as its output, to a file.
     1	type file;
     2
     3	app (file o) simulation ()
     4	{
     5	  simulate stdout=filename(o);
     6	}
     7
     8	file f <"sim.out">;
     9	f = simulation();
Line 1: Defines file as a type.
Line 3-6: Defines an app function called simulation, which has no input arguments and has
one output, type file. An app function is a function that is executed on target resources.
Line 5: This line within the app function definition defines the
command used to invoke the application on the selected compute
resource (here, just the local login host). stdout and stderr are
keywords that can be used to redirect these output streams from the
application to files defined by the user. filename() gets the
correct path that the file variable o maps to on the selected
compute resource.
Line 8: A variable f of type file is defined that maps to a file called sim.out on the
filesystem. The angle bracket < > are used to define mappings from files and directories to
Swift variables. For more on mappers here’s mapper reference
Line 9: Variable f is assigned the output of the invocation of the
app function simulation().
To run this script, run the following command:
$ cd swift-tutorial/part01
$ swift p1.swift
Swift 0.96.2 git-rev: 6390483cc61035700e7278ae1a888f27b3bded2b heads/release-0.96-swift 6286
RunID: run001
Progress: Thu, 22 Jan 2015 16:21:51-0600
Progress: Thu, 22 Jan 2015 16:21:52-0600  Active:1
Final status:Thu, 22 Jan 2015 16:22:11-0600  Finished successfully:1

$ cat sim.out
      18
To cleanup the directory and remove all outputs (including the log
files and directories that Swift generates), run the cleanup script
which is located in the tutorial PATH:
$ cleanup|
|
You will also find a Swift configuration file swift.conf in
each partNN directory of this tutorial. This file specifies
system-specific details of the target computational resources where
Swift will run the application programs invoked by your script. This
configuration file will be explained in more detail in parts 4-6. It
can be ignored for now. |
Example 2: Running an ensemble of many apps in parallel with a "foreach" loop
The p2.swift script introduces the foreach parallel iteration construct to run many concurrent simulations.

     1	type file;
     2
     3	app (file o) simulation ()
     4	{
     5	  simulate stdout=filename(o);
     6	}
     7
     8	foreach i in [0:9] {
     9	  file f <single_file_mapper; file=strcat("output/sim_",i,".out")>;
    10	  f = simulation();
    11	}
Lines 1-6: The simulaton app is declared as in Example 1.
Lines 8-11: The foreach loop construct iterates over a list of
integers from 0 to 9. The statements inside the foreach loop will be
executed 10 times, potentially in parallel (based on how many CPUs are
available and requested on the selected resource).
Line 9: Here we use define a variable f of type file, and use
the single_file_mapper to map it to a unique file name created by
including the loop index in the filename. The single_file_mapper, as
it’s name suggests, maps a single file, whose name is specified using
the file attribute, to a Swift variable.
Line 10: The results from the app simulation are returned to the
variable f, which is mapped to unique file name in each iteration of
the loop.
This is an example of how you can name the output files of an ensemble
run. In this case, the output files will be output/sim_N.out.
To run the script and view the output:
$ cd swift-tutorial/part02
$ swift p2.swift
Swift 0.96.2 git-rev: 6390483cc61035700e7278ae1a888f27b3bded2b heads/release-0.96-swift 6286
RunID: run001
Progress: Thu, 22 Jan 2015 16:24:07-0600
Progress: Thu, 22 Jan 2015 16:24:08-0600 Active:10
Final status:Thu, 22 Jan 2015 16:24:27-0600 Finished successfully:10
$ ls output/
sim_0.out sim_1.out sim_2.out sim_3.out sim_4.out sim_5.out sim_6.out sim_7.out sim_8.out sim_9.out
$ cat output/sim_1.out
13
$ cat output/sim_2.out
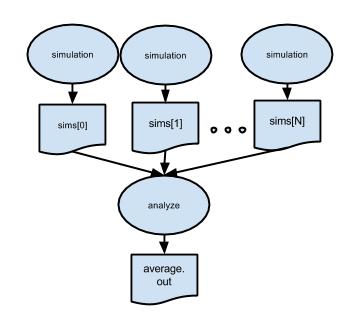
4Example 3: Analyzing results of a parallel ensemble
After all the simulations in an ensemble run are done, you will
typically want to gather and analyze the simulation results with a
post-processing analysis program or script. The example p3.swift shows how to do this.
Here, the files created by all of the runs of simulate are
averaged by the trivial "analysis application" stats:

     1	type file;
     2
     3	app (file o) simulation (int sim_steps, int sim_range, int sim_values)
     4	{
     5	  simulate "--timesteps" sim_steps "--range" sim_range "--nvalues" sim_values stdout=filename(o);
     6	}
     7
     8	app (file o) analyze (file s[])
     9	{
    10	  stats filenames(s) stdout=filename(o);
    11	}
    12
    13	int nsim   = toInt(arg("nsim","10"));
    14	int steps  = toInt(arg("steps","1"));
    15	int range  = toInt(arg("range","100"));
    16	int values = toInt(arg("values","5"));
    17
    18	file sims[];
    19
    20	foreach i in [0:nsim-1] {
    21	  file simout <single_file_mapper; file=strcat("output/sim_",i,".out")>;
    22	  simout = simulation(steps,range,values);
    23	  sims[i] = simout;
    24	}
    25
    26	file stats<"output/average.out">;
    27	stats = analyze(sims);
Line 3-6: The Swift app function simulation() has been modified to
accept 3 arguments to control the simulation. Line 5 defines the
command invocation to be run on the compute resources.
Line 8-11: A new app function analyze() is defined. This app takes an
array of files as input and returns a single file. When variables
mapped to files are passed as inputs or outputs to an app, Swift
manages the movement ("staging") of these files between the host where
the Swift script is executed and the compute resources where the
applications run. Line 10 defines the command to be run on the compute
resources.
Line 13-16: The built-in function arg(name,default) extracts
user-specific command line arguments that are given when the Swift
script is called. The second argument to arg is used as the default
if this option is not used on the command line.
Line 18: sims is defined as an array of elements of files.
Line 20-24: The foreach loop iterates over a list of integers
[0:nsim-1]. nsim is set by placing a -nsim option on the swift
command invocation. If -nsim is not set on the command line, the
nsim variable defaults to 10 (line 13). In each loop iteration,
line 21 defines a temporary output file; line 22 runs the
simulation() function, which actually calls the simulate app; and
line 23 copies the simulation function output to an element of the
sims array, indexed by the foreach loop index i.
Line 26: stats is defined as a file variable and mapped to the
file output/average.out
Line 27: The array of files sims[] is passed to the function
analyze() (which runs the analyze app), whose results are stored
in stats.
To run:
$ cd swift-tutorial/part03
$ swift p3.swift
Swift 0.96.2 git-rev: 6390483cc61035700e7278ae1a888f27b3bded2b heads/release-0.96-swift 6286
RunID: run001
Progress: Thu, 22 Jan 2015 16:27:23-0600
Progress: Thu, 22 Jan 2015 16:27:24-0600  Active:10
Final status:Thu, 22 Jan 2015 16:27:44-0600  Finished successfully:11

$ ls output/
average.out  sim_0.out  sim_1.out  sim_2.out  sim_3.out  sim_4.out  sim_5.out  sim_6.out  sim_7.out  sim_8.out  sim_9.out

$ cat output/average.out
52
Note that in p3.swift we expose more of the capabilities of the
simulate.sh application to the simulation() app function:
app (file o) simulation (int sim_steps, int sim_range, int sim_values)
{
  simulate "--timesteps" sim_steps "--range" sim_range "--nvalues" sim_values stdout=filename(o);
}
p3.swift also shows how to fetch application-specific values from
the swift command line in a Swift script using the built-in function
arg() which accepts a keyword-style user-specified command line
argument name and its default value:
int nsim   = toInt(arg("nsim","10"));
int steps  = toInt(arg("steps","1"));
int range  = toInt(arg("range","100"));
int values = toInt(arg("values","5"));
Now lets perform more runs of this Swift script, each with more
timesteps, and each producing more than one value, within a specified
range of values (between 0 and range), using command-line arguments of the form
-parameterName=value specified on the swift command line.
For example, try running the swift command with -nsim=100 and
-steps=1 to perform 100 simulations of 1 second each:
$ swift p3.swift -nsim=100 -steps=1
Swift 0.96.2 git-rev: 6390483cc61035700e7278ae1a888f27b3bded2b heads/release-0.96-swift 6286
RunID: run002
Progress: Thu, 22 Jan 2015 16:29:45-0600
Progress: Thu, 22 Jan 2015 16:29:46-0600  Selecting site:80  Active:20
Progress: Thu, 22 Jan 2015 16:30:07-0600  Selecting site:60  Active:20  Finished successfully:20
Progress: Thu, 22 Jan 2015 16:30:28-0600  Selecting site:40  Active:20  Finished successfully:40
Progress: Thu, 22 Jan 2015 16:30:49-0600  Selecting site:20  Active:20  Finished successfully:60
Progress: Thu, 22 Jan 2015 16:31:10-0600  Active:20  Finished successfully:80
Final status:Thu, 22 Jan 2015 16:31:31-0600  Finished successfully:101
We can see from Swift’s "progress" status output that the tutorial’s
default swift.conf parameters for local execution allow Swift to run
up to 20 application invocations concurrently on the login node. We
will look at this in more detail in the next sections where we execute
applications on the compute nodes of several remote XSEDE sites (i.e.,
XSEDE "resource providers").
Tutorial Section Two
This section introduces the aspects of running on remote computational resources.
We will go into the configuration aspects that allow Swift to run applications on computation
resources. The swift.conf file contains definitions of various aspects of different remote
computational resources that Swift can run your tasks on. Swift automatically looks for this
file when it runs.
Examples 4-6 are designed to run on remote sites, so they require the configuration to
be set in the swift.conf. The supplied swift.conf config file, define several sites, and in
this tutorial, we use the following sites:
-
Bridges at PSC
-
Blue Waters at NCSA
To configure the definition for a particular site, open the swift-tutorial/swift.conf file and edit the site entry for that site. For example, if you want to run the tutorial on Blue waters, edit the site.bluewaters entry in the swift-tutorial/swift.conf file and follow the instructions given for Blue waters in the config file. Alternatively you can specify the target site on the swift commandline.
Here is the section of the swift.conf file that describes the XSEDE resource "Blue Waters":
# Configuration for Bridges at the Pittsburgh Supercomputing Center
site.bridges {
    execution {
        type      : "coaster"                         # Use coasters to run on remote sites
        URL       : "bridges.psc.xsede.org"           # Comet login URL - not used for local:slurm
        jobManager: "local:slurm"                     # use slurm commands to submit jobs locally
        options {
            maxJobs         : 1                       # Max jobs submitted to LRM
            nodeGranularity : 2                       # Nodes per job
            maxNodesPerJob  : 2                       # Nodes per job
            tasksPerNode    : 1                       # Tasks per Node
            maxJobTime      : "00:30:00"              # Time requested per job
            jobQueue        : "RM"               # Submit to compute partition (from shared)
            jobOptions { jobType: "single"}
        }
    }
    staging             : "local"                     # Stage files from "local" fs to compute nodes
    workDirectory       : "/home/"${env.USER}"/swiftwork" # Work dir on compute nodes
    maxParallelTasks    : 101                         # Maximum number of parallel tasks
    initialParallelTasks: 100                         # Maximum number of tasks at start
    app.ALL {
            executable: "*"                           # All apps to be found from PATH
    }
}|
|
You tell Swift which resource site(s) it should execute the apps of your workflow script
on by using the -sites option of the swift command. For example: |
swift -sites bluewaters myscript.swift -nmodels=1024Example 4: Running a simple app on a remote resource
p4.swift shows a simple app that takes a file containing random
numbers and sorts them, then returns the sorted output. The part04
folder has a file, unsorted.txt, that contains 100 random integers
ranging from 0 to 99. We will run the job on a remote resource. Be
sure that you have configured the swift.conf for your target remote
site.
     1	type file;
     2
     3	app (file out) sortdata (file unsorted)
     4	{
     5	    sort "-n" filename(unsorted) stdout=filename(out);
     6	}
     7
     8	file unsorted <"unsorted.txt">;
     9	file sorted   <"sorted.txt">;
    10
    11	sorted = sortdata(unsorted);
Line 3-6: The application function sortdata() takes a file (mapped
to unsorted) and returns a file mapped to out. It uses the
command-line utility sort to process the file passed to it.
Line 8-9: File variables sorted and unsorted are defined and
mapped to specific files.
Line 11: The new file sorted.txt (mapped to the variable sorted)
will be created to hold the output of the app invocation
sortdata(unsorted).
When a remote site is selected as the execution target for an
application (in this case, sort), Swift will connect to that site
(in this case, with ssh) and start a service that submits worker
processes which in turn will execute Swift app invocation tasks. Swift
moves (or "stages") any needed input and output files (as declared in the app
function interface definition) between the target systems and the
machine you are running Swift on.
When the swift command completes, you should see a new sorted.txt
file in the folder. This contains contains the sorted results (the
output of the sort command).
For example, to run the job on the Bluewaters system and to view the output:
$ cd swift-tutorial/part04
$ swift -sites bridges p4.swift
Swift 0.96.2 git-rev: b9611649002eecd640fc6c58bbb88cb35ce03539 heads/release-0.96-swift 6287
RunID: run001
Progress: Wed, 10 Aug 2016 15:21:55-0400
Progress: Wed, 10 Aug 2016 15:21:56-0400  Submitted:1
Final status: Wed, 10 Aug 2016 15:22:24-0400  Finished successfully:1

$ more unsorted.txt
7
49
73
58
30
72
...

$ more sorted.txt
1
2
3
4
5
...|
|
Once the Swift status shows the jobs to be "Submitted", the time it will take to complete the jobs can vary greatly based on how congested the queues are on the target resource. |
|
|
For this XSEDE tutorial, the swift.conf config provided in the
tutorial folders is sufficient. To learn more about configuring Swift
for specific sites and resource needs, a
Remote site configuration reference for the
XSEDE sites supported in the tutorial is included near the end of this
tutorial page. That section also explains how to check the status of
your jobs in the queue for systems with PBS, Condor or Slurm
schedulers. |
Example 4b: Running on Blue Waters
To get running on Blue Water follow instruction in the System resources section for Blue Waters to get the tutorial folders locally. Once the swift-tutorial folder is setup, go to the part04. To run p4.swift on Blue Waters, simply invoke the swift command with the sites argument -sites bluewaters.
$ cd swift-tutorial

$ source setup.sh
Adding /u/training/<TRAIN_ACCOUNT>/xsede-tutorial/bin:/u/training/tra578/xsede-tutorial/app: to front of PATH
h2ologin1.ncsa.illinois.edu
-Swift version is Swift 0.96.2 git-rev: b9611649002eecd640fc6c58bbb88cb35ce03539 heads/release-0.96-swift 6287

$ cd part04
$ swift -sites bluewaters p4.swift
Swift 0.96.2 git-rev: b9611649002eecd640fc6c58bbb88cb35ce03539 heads/release-0.96-swift 6287
RunID: run004
Progress: Wed, 10 Aug 2016 12:13:47-0500
Progress: Wed, 10 Aug 2016 12:13:48-0500  Submitted:1
Progress: Wed, 10 Aug 2016 12:14:18-0500  Submitted:1
Progress: Wed, 10 Aug 2016 12:14:48-0500  Submitted:1
Progress: Wed, 10 Aug 2016 12:15:18-0500  Submitted:1
Progress: Wed, 10 Aug 2016 12:15:48-0500  Submitted:1
Progress: Wed, 10 Aug 2016 12:16:18-0500  Submitted:1
Progress: Wed, 10 Aug 2016 12:16:48-0500  Submitted:1
Progress: Wed, 10 Aug 2016 12:17:18-0500  Submitted:1
Progress: Wed, 10 Aug 2016 12:17:48-0500  Submitted:1
Progress: Wed, 10 Aug 2016 12:18:18-0500  Submitted:1
Progress: Wed, 10 Aug 2016 12:18:48-0500  Submitted:1
Progress: Wed, 10 Aug 2016 12:19:18-0500  Submitted:1
Progress: Wed, 10 Aug 2016 12:19:48-0500  Submitted:1
Progress: Wed, 10 Aug 2016 12:20:18-0500  Submitted:1
Progress: Wed, 10 Aug 2016 12:20:48-0500  Submitted:1
Progress: Wed, 10 Aug 2016 12:21:18-0500  Submitted:1
Progress: Wed, 10 Aug 2016 12:21:48-0500  Submitted:1
Progress: Wed, 10 Aug 2016 12:22:18-0500  Submitted:1
Progress: Wed, 10 Aug 2016 12:22:48-0500  Submitted:1
Progress: Wed, 10 Aug 2016 12:23:18-0500  Submitted:1
Progress: Wed, 10 Aug 2016 12:23:48-0500  Submitted:1
Final status: Wed, 10 Aug 2016 12:23:49-0500 Finished successfully:1|
|
For examples 5 and 6 you can use the same options as above to run them on Blue Waters |
Example 5: Running a parallel ensemble on compute resources
Example p5.swift and its associated swift.conf file will run our
mock "simulation" applications on the compute nodes of a remote XSEDE
resource. The script is similar to p3.swift, but specifies that
each simulation() app invocation should additionally return the log
file that the application writes to stderr.
In p3.swift the apps simulation() and stats() called the
excutable programs stats and simulate which were available on the
local machine and were present in the system path. The p5.swift
script instead passes the executables programs as additional file
arguments on the app invocation, to make them available on the remote
compute node.
In this case, these "apps" are in fact trivial shell scripts. In more
realistic and hence complex cases, Swift can run apps that are
pre-installed on the remote machine, as we did with sort in example
4. Swift can also install a new app on a site or compute node the
first time that an app needs to run on a remote location, using its
softImage feature (described in the Swift User Guide).
app (file out, file log) simulation (int sim_steps, int sim_range, int sim_values, file sim_script)
{
  bash @sim_script "--timesteps" sim_steps "--range" sim_range "--nvalues" sim_values
       stdout=@out stderr=@log;
}
     1	type file;
     2
     3	app (file out, file log) simulation (int sim_steps, int sim_range, int sim_values, file sim_script)
     4	{
     5	  bash @sim_script "--timesteps" sim_steps "--range" sim_range "--nvalues" sim_values stdout=@out stderr=@log;
     6	}
     7
     8	app (file out, file log) analyze (file s[], file stat_script)
     9	{
    10	  bash @stat_script filenames(s) stdout=@out stderr=@log;
    11	}
    12
    13	int nsim   = toInt(arg("nsim",   "10"));
    14	int steps  = toInt(arg("steps",  "1"));
    15	int range  = toInt(arg("range",  "100"));
    16	int values = toInt(arg("values", "5"));
    17
    18	file sims[];
    19	file simulate_script <"simulate.sh">;
    20	file stats_script <"stats.sh">;
    21
    22	foreach i in [0:nsim-1] {
    23	  file simout <single_file_mapper; file=strcat("output/sim_",i,".out")>;
    24	  file simlog <single_file_mapper; file=strcat("output/sim_",i,".log")>;
    25	  (simout,simlog) = simulation(steps,range,values,simulate_script);
    26	  sims[i] = simout;
    27	}
    28
    29	file stats_out<"output/average.out">;
    30	file stats_log<"output/average.log">;
    31	(stats_out, stats_log) = analyze(sims,stats_script);
Line 3-6: The application simulation() has been modified to take
the simulation script as an argument through the file variable
sim_script and to return a log file which contains output on the
stderr stream from the application. Instead of calling the
application simulation the command line string now calls bash,
which in turns runs the simulation script. (Note that in our example
codes, simulate is just a symbolic link alias for simulate.sh).
Line 8-11: The application analyze() has been modified to return a
log file which contains output on the stderr stream from the
application. You can use this log file to verify where the remote
application ran, by using grep to search for "hostname".
To run:
$ cd swift-tutorial/part05
$ swift -sites <SITES> p5.swift
Swift 0.96.2 git-rev: 6390483cc61035700e7278ae1a888f27b3bded2b heads/release-0.96-swift 6286
RunID: run001
Progress: Thu, 22 Jan 2015 17:15:01-0600
Progress: Thu, 22 Jan 2015 17:15:02-0600  Submitting:10
Progress: Thu, 22 Jan 2015 17:15:16-0600  Submitted:10
Progress: Thu, 22 Jan 2015 17:15:24-0600  Submitted:6  Active:4
Progress: Thu, 22 Jan 2015 17:15:45-0600  Stage in:1  Submitted:3  Active:2  Finished successfully:4
Progress: Thu, 22 Jan 2015 17:15:46-0600  Stage in:1  Submitted:2  Active:3  Finished successfully:4
Progress: Thu, 22 Jan 2015 17:15:47-0600  Submitted:2  Active:4  Finished successfully:4
Progress: Thu, 22 Jan 2015 17:16:07-0600  Active:3  Finished successfully:7
Progress: Thu, 22 Jan 2015 17:16:08-0600  Active:2  Stage out:1  Finished successfully:7
Progress: Thu, 22 Jan 2015 17:16:21-0600  Active:2  Finished successfully:8
Progress: Thu, 22 Jan 2015 17:16:28-0600  Stage in:1  Finished successfully:10
Progress: Thu, 22 Jan 2015 17:16:29-0600  Stage out:1  Finished successfully:10
Final status: Thu, 22 Jan 2015 17:16:51-0600  Finished successfully:11

# Open the output/average.log to take a look at the rich set of machine specific
# information collected from the target system.
$ more output/average.log
Start time: Thu Jan 22 17:16:29 CST 2015
Running as user: uid=6040(yadunandb) gid=1000(ci-users) groups=1000(ci-users),1033(vdl2-svn),1082(CI-CCR000013),1094(CI-SES000031),1120(CI-IBN000050)
Running on node: nid00116
...
Performing larger Swift runs
To run larger tests, two changes are required. The first is a change
to the command line arguments. The example below will run 100
simulations (-nsim=100) with each simulation taking 5 seconds
(-steps=5). The second change increase the resource limits specified
in the swift.conf file (for example, increasing the number of nodes
requested, the number of tasks to be run concurrently on each compute
node, etc.)
# You can increase maxJobs or tasksPerNode to increase the resources available to Swift
# With the default swift.conf, the following will be processed 4 tasks at a time :
$ swift p5.swift -steps=5 -nsim=100
Swift 0.96.2 git-rev: 6390483cc61035700e7278ae1a888f27b3bded2b heads/release-0.96-swift 6286
RunID: run001
Progress: Thu, 22 Jan 2015 17:35:01-0600
Progress: Thu, 22 Jan 2015 17:35:02-0600  Submitting:100
Progress: Thu, 22 Jan 2015 17:35:16-0600  Submitted:100
Progress: Thu, 22 Jan 2015 17:35:27-0600  Submitted:96  Active:4
Progress: Thu, 22 Jan 2015 17:35:52-0600  Submitted:92  Active:4  Finished successfully:4
Progress: Thu, 22 Jan 2015 17:36:17-0600  Submitted:92  Active:3  Stage out:1  Finished successfully:4
Progress: Thu, 22 Jan 2015 17:36:18-0600  Submitted:88  Active:4  Finished successfully:8
...
Progress: Thu, 22 Jan 2015 17:46:27-0600  Stage out:1  Finished successfully:99
Progress: Thu, 22 Jan 2015 17:46:40-0600  Stage in:1  Finished successfully:100
Progress: Thu, 22 Jan 2015 17:46:53-0600  Active:1  Finished successfully:100
Final status: Thu, 22 Jan 2015 17:46:53-0600  Finished successfully:101

# From the time-stamps it can be seen that run001 took ~12minutes, with only 4 jobs active at
# any given time

# The following run was done with swift.conf modified to use higher tasksPerNode and maxJobs
# maxJobs       : 2      # Increased from 1
# tasksPerNode  : 15     # Increased from 4
$ swift p5.swift -steps=5 -nsim=100
Swift 0.96.2 git-rev: 6390483cc61035700e7278ae1a888f27b3bded2b heads/release-0.96-swift 6286
RunID: run002
Progress: Thu, 22 Jan 2015 17:30:35-0600
Progress: Thu, 22 Jan 2015 17:30:36-0600  Submitting:100
Progress: Thu, 22 Jan 2015 17:30:49-0600  Submitted:100
Progress: Thu, 22 Jan 2015 17:31:04-0600  Submitted:85  Active:15
Progress: Thu, 22 Jan 2015 17:31:05-0600  Stage in:8  Submitted:77  Active:15
Progress: Thu, 22 Jan 2015 17:31:06-0600  Submitted:70  Active:30
Progress: Thu, 22 Jan 2015 17:31:30-0600  Submitted:55  Active:30  Finished successfully:15
Progress: Thu, 22 Jan 2015 17:31:31-0600  Submitted:53  Active:29  Stage out:1  Finished successfully:17
Progress: Thu, 22 Jan 2015 17:31:32-0600  Stage in:1  Submitted:40  Active:29  Finished successfully:30
Progress: Thu, 22 Jan 2015 17:31:33-0600  Submitted:40  Active:30  Finished successfully:30
...
Progress: Thu, 22 Jan 2015 17:32:23-0600  Active:17  Stage out:1  Finished successfully:82
Progress: Thu, 22 Jan 2015 17:32:24-0600  Active:10  Finished successfully:90
Progress: Thu, 22 Jan 2015 17:32:47-0600  Active:6  Stage out:1  Finished successfully:93
Progress: Thu, 22 Jan 2015 17:32:48-0600  Stage out:1  Finished successfully:99
Progress: Thu, 22 Jan 2015 17:32:49-0600  Stage in:1  Finished successfully:100
Progress: Thu, 22 Jan 2015 17:33:02-0600  Active:1  Finished successfully:100
Final status: Thu, 22 Jan 2015 17:33:02-0600  Finished successfully:101
Example 6: Specifying more complex workflow patterns
The p6.swift script expands the workflow pattern of p5.swift to
add additional stages to the workflow. This example illustrates how
to specify the common scientific workflow pattern of running a
"preparation" program for each unique simulation.
Here, we generate a dynamic random number "seed" value that will be
used by all of the simulations, and for each simulation, we run a
pre-processing application to generate a unique "bias file" for that
simulation. The bias files contains new random numbers which are
added to the random numbers generated in simulate. The new workflow
pattern is shown below, followed by the Swift script.

     1	type file;
     2
     3	# app() functions for application programs to be called:
     4
     5	app (file out) genseed (int nseeds, file seed_script)
     6	{
     7	  bash @seed_script "-r" 2000000 "-n" nseeds stdout=@out;
     8	}
     9
    10	app (file out) genbias (int bias_range, int nvalues, file bias_script)
    11	{
    12	  bash @bias_script "-r" bias_range "-n" nvalues stdout=@out;
    13	}
    14
    15	app (file out, file log) simulation (int timesteps, int sim_range,
    16	                                     file bias_file, int scale, int sim_count,
    17	                                     file sim_script, file seed_file)
    18	{
    19	  bash @sim_script "-t" timesteps "-r" sim_range "-B" @bias_file "-x" scale
    20	           "-n" sim_count "-S" @seed_file stdout=@out stderr=@log;
    21	}
    22
    23	app (file out, file log) analyze (file s[], file stat_script)
    24	{
    25	  bash @stat_script filenames(s) stdout=@out stderr=@log;
    26	}
    27
    28	# Command line arguments
    29
    30	int  nsim  = toInt(arg("nsim",   "10"));  # number of simulation programs to run
    31	int  steps = toInt(arg("steps",  "1"));   # number of timesteps (seconds) per simulation
    32	int  range = toInt(arg("range",  "100")); # range of the generated random numbers
    33	int  values = toInt(arg("values", "10"));  # number of values generated per simulation
    34
    35	# Main script and data
    36
    37	file simulate_script <"simulate.sh">;
    38	file stats_script <"stats.sh">;
    39	file seedfile <"output/seed.dat">;        # Dynamically generated bias for simulation ensemble
    40
    41	tracef("\n*** Script parameters: nsim=%i range=%i num values=%i\n\n", nsim, range, values);
    42	seedfile = genseed(1,simulate_script);
    43
    44	file sims[];                      # Array of files to hold each simulation output
    45
    46	foreach i in [0:nsim-1] {
    47	  file biasfile <single_file_mapper; file=strcat("output/bias_",i,".dat")>;
    48	  file simout   <single_file_mapper; file=strcat("output/sim_",i,".out")>;
    49	  file simlog   <single_file_mapper; file=strcat("output/sim_",i,".log")>;
    50	  biasfile = genbias(1000, 20, simulate_script);
    51	  (simout,simlog) = simulation(steps, range, biasfile, 1000000, values, simulate_script, seedfile);
    52	  sims[i] = simout;
    53	}
    54
    55	file stats_out<"output/average.out">;
    56	file stats_log<"output/average.log">;
    57	(stats_out,stats_log) = analyze(sims, stats_script);
Note that the workflow execution pattern is driven by data flow
dependencies. Each simulation depends on the seed value, calculated in
line 42 ( seedfile = genseed(1,simulate_script) ) and on the bias
file, computed and then consumed in these two dependent statements at
lines 50-51:
  biasfile = genbias(1000, 20, simulate_script);
  (simout,simlog) = simulation(steps, range, biasfile, 1000000, values, simulate_script, seedfile);
To run:
$ cd swift-tutorial/part06
$ swift p6.swift
Swift 0.96.2 git-rev: 6390483cc61035700e7278ae1a888f27b3bded2b heads/release-0.96-swift 6286
RunID: run001
Progress: Thu, 22 Jan 2015 17:54:47-0600

*** Script parameters: nsim=10 range=100 num values=10

Progress: Thu, 22 Jan 2015 17:54:48-0600  Submitting:11
Progress: Thu, 22 Jan 2015 17:55:01-0600  Submitted:11
Progress: Thu, 22 Jan 2015 17:55:08-0600  Stage in:3  Submitted:8
Progress: Thu, 22 Jan 2015 17:55:09-0600  Submitted:7  Active:4
Progress: Thu, 22 Jan 2015 17:55:29-0600  Submitted:4  Active:4  Finished successfully:3
Progress: Thu, 22 Jan 2015 17:55:32-0600  Submitted:3  Active:4  Finished successfully:4
Progress: Thu, 22 Jan 2015 17:55:49-0600  Stage in:3  Submitted:6  Active:1  Finished successfully:7
Progress: Thu, 22 Jan 2015 17:55:50-0600  Submitted:6  Active:4  Finished successfully:7
Progress: Thu, 22 Jan 2015 17:55:52-0600  Submitted:6  Active:3  Stage out:1  Finished successfully:7
Progress: Thu, 22 Jan 2015 17:56:10-0600  Submitted:6  Active:4  Finished successfully:11
Progress: Thu, 22 Jan 2015 17:56:31-0600  Stage in:2  Submitted:4  Active:2  Finished successfully:13
Progress: Thu, 22 Jan 2015 17:56:32-0600  Submitted:2  Active:4  Finished successfully:15
Progress: Thu, 22 Jan 2015 17:56:53-0600  Active:2  Finished successfully:19
Progress: Thu, 22 Jan 2015 17:57:14-0600  Stage in:1  Finished successfully:21
Final status: Thu, 22 Jan 2015 17:57:16-0600  Finished successfully:22

# which produces the following output:
$ ls output/
average.log  bias_1.dat  bias_4.dat  bias_7.dat  seed.dat   sim_1.log  sim_2.out  sim_4.log  sim_5.out  sim_7.log  sim_8.out
average.out  bias_2.dat  bias_5.dat  bias_8.dat  sim_0.log  sim_1.out  sim_3.log  sim_4.out  sim_6.log  sim_7.out  sim_9.log
bias_0.dat   bias_3.dat  bias_6.dat  bias_9.dat  sim_0.out  sim_2.log  sim_3.out  sim_5.log  sim_6.out  sim_8.log  sim_9.out

# Each sim_N.out file is the sum of its bias file plus newly "simulated" random output scaled by 1,000,000:

$ cat output/bias_0.dat
     302
     489
      81
     582
     664
     290
     839
     258
     506
     310
     293
     508
      88
     261
     453
     187
      26
     198
     402
     555

$ cat output/sim_0.out
64000302
38000489
32000081
12000582
46000664
36000290
35000839
22000258
49000506
75000310
(For simplicity, we produce a fixed number of values in each bias file. Simulations ignore any unneeded bias numbers, or use the last bias number repeatedly as needed).
|
|
As an exercise, modify the example scripts and apps to produce the same number of bias values as are needed for each simulation. As a further exercise, modify the script to generate a unique seed value for each simulation, which is a common practice in ensemble computations. |
Example 7: Running a simple MPI application workflow
In this example we illustrate a simple MPI workflow based on a trivial MPI "Hello World" application that simply sleeps for a specifiable delay and then prints the ranks and hostnames that the the application is running on.
We will be running on the login host of Bridges.
$ cd part07

$ swift -sites mpibridges p7.swift
Swift 0.96.2 git-rev: b9611649002eecd640fc6c58bbb88cb35ce03539 heads/release-0.96-swift 6287
RunID: run002
Progress: Wed, 10 Aug 2016 14:39:27-0400
Progress: Wed, 10 Aug 2016 14:39:28-0400  Submitted:10
Progress: Wed, 10 Aug 2016 14:39:32-0400  Submitted:9  Active:1
Progress: Wed, 10 Aug 2016 14:39:40-0400  Submitted:8  Active:1  Finished successfully:1
Progress: Wed, 10 Aug 2016 14:39:48-0400  Submitted:8  Stage out:1  Finished successfully:1
Progress: Wed, 10 Aug 2016 14:40:05-0400  Stage in:1  Submitted:7  Finished successfully:2
Progress: Wed, 10 Aug 2016 14:40:35-0400  Stage in:1  Submitted:7  Finished successfully:2
Progress: Wed, 10 Aug 2016 14:40:36-0400  Submitted:7  Active:1  Finished successfully:2
Progress: Wed, 10 Aug 2016 14:40:42-0400  Submitted:7  Stage out:1  Finished successfully:2
Progress: Wed, 10 Aug 2016 14:41:12-0400  Submitted:7  Stage out:1  Finished successfully:2
Progress: Wed, 10 Aug 2016 14:41:34-0400  Submitted:6  Active:1  Finished successfully:3
Progress: Wed, 10 Aug 2016 14:41:42-0400  Submitted:6  Stage out:1  Finished successfully:3
Progress: Wed, 10 Aug 2016 14:42:12-0400  Stage in:1  Submitted:5  Finished successfully:4
Progress: Wed, 10 Aug 2016 14:42:14-0400  Stage in:1  Submitted:4  Finished successfully:5
Progress: Wed, 10 Aug 2016 14:42:22-0400  Submitted:4  Stage out:1  Finished successfully:5
Progress: Wed, 10 Aug 2016 14:42:34-0400  Stage in:1  Submitted:3  Finished successfully:6
Progress: Wed, 10 Aug 2016 14:42:42-0400  Submitted:3  Stage out:1  Finished successfully:6
Progress: Wed, 10 Aug 2016 14:42:43-0400  Submitted:2  Active:1  Finished successfully:7
Progress: Wed, 10 Aug 2016 14:42:51-0400  Submitted:2  Stage out:1  Finished successfully:7
Progress: Wed, 10 Aug 2016 14:43:21-0400  Submitted:2  Stage out:1  Finished successfully:7
Progress: Wed, 10 Aug 2016 14:43:34-0400  Stage in:1  Submitted:1  Finished successfully:8
Progress: Wed, 10 Aug 2016 14:43:42-0400  Active:1  Finished successfully:9
Final status: Wed, 10 Aug 2016 14:43:49-0400  Finished successfully:10
Example 8: Running a more sophisticated MPI workflow
|
|
We will not be using this example for this tutorial session. As a suggestion, users are encouraged to try this example on their own. |
In example part08 we use a simple MPI Mandelbrot application that
generates fractal images. We run this application with a range of
parameters that determine the level of detail in the mandelbrot image,
and create a sequence of images, which are then stitched together to
create a montage and a movie to show the impact of the parameter
values on the geometry.
The application takes the resolution of the image, an mpi strategy and
the number of iterations computed per point in the problem space. The
swift script itself invokes a wrapper script run_mandelbrot which
encapsulated the site-specific differences in how MPI applications
need to be invoked for multi-node program invocations. This script in
turn executes the MPI application mandelbrot that has been compiled
and installed on the Bridges and Blue Waters sites.
The workflow invokes the MPI application mandelbrot across a range
of values for the parameter iterations, which determine the number
of iterations per point in fractal space. The higher the number of
iterations, the higher the degree of detail in the generated
Mandelbrot fractal image. The foreach loop describes the parameter
sweep.
The results generated from the the mandelbrot application are
assembled by the application assemble. At the end of each invocation
of the mandelbrot application, the generated image files are staged
back to the local machine. The assemble step stitches these results
into a "movie" file output/mandel.gif and a montage image
output/montage.jpg. This processing is done on the site localhost,
as it does not benefit from running on a 16-core compute node. Hence
the assemble application is only defined for the site localhost in
the swift.conf, which ensures that the assemble application runs
only on the local machine.
Currently, for running MPI applications, each Swift worker manages one parallel job resource/site job at a time, and can run one MPI job at a time. Multiple MPI applications can be invoked, one at a time, within the same resource job. If enough resources were available, multiple MPI jobs could be invoked in parallel using multiple jobs on the site.
     1	type file;
     2
     3	app (file image, file out, file err) mandelbrot (file mandel_sh, int iterations, int resolution)
     4	{
     5	    bash @mandel_sh "-i" iterations "-s 1 -r" resolution "-f" @image stdout=@out stderr=@err;
     6	}
     7
     8	app (file movie, file montage, file out, file err) assemble (file[] mandel_imgs)
     9	{
    10	    assemble @movie @montage @mandel_imgs stdout=@out stderr=@err;
    11	}
    12
    13	int  itermax     = toInt(arg("niter", "20"));     # number of iterations for mandelbrot
    14	int  step        = toInt(arg("step", "5"));       # number of iterations for mandelbrot
    15	int  resolution  = toInt(arg("res",  "10000"));   # Resolution of result
    16
    17	// 5 -> 100 iterations stepping by 5
    18	file mandel_img[] <simple_mapper; prefix="output/mandel_", suffix=".jpg">;
    19	file mandel_out[] <simple_mapper; prefix="output/mandel_", suffix=".out">;
    20	file mandel_err[] <simple_mapper; prefix="output/mandel_", suffix=".err">;
    21	file mandel_sh <"./bin/run_mandelbrot">;
    22
    23	foreach i in [5:itermax:step]{
    24	    tracef("i = %i \n", i);
    25	    (mandel_img[i], mandel_out[i], mandel_err[i]) = mandelbrot(mandel_sh, i, resolution);
    26	}
    27
    28	file movie   <"output/mandel.gif">;
    29	file montage <"output/montage.jpg">;
    30	file assemble_out <"output/assemble.out">;
    31	file assemble_err <"output/assemble.err">;
32 (movie, montage, assemble_out, assemble_err) = assemble (mandel_img);|
|
Source the mpi_setup.sh script in the part07 folder before running the swift scripts. |
cd swift-tutorial/part08
source mpi_setup.sh
To run:
$ cd swift-tutorial/part08

$ source mpi_setup.sh  # Dont forget to do this, once!

$ swift -sites blacklight,localhost p8.swift
Swift 0.96.2 git-rev: 6390483cc61035700e7278ae1a888f27b3bded2b heads/release-0.96-swift 6286
RunID: run001
Progress: Sun, 26 Jul 2015 18:29:04-0400
i = 10
i = 15
i = 5
i = 20
Progress: Sun, 26 Jul 2015 18:29:05-0400  Submitting:4
Progress: Sun, 26 Jul 2015 18:29:18-0400  Submitted:4
Progress: Sun, 26 Jul 2015 18:29:21-0400  Stage in:1  Submitted:3
Progress: Sun, 26 Jul 2015 18:29:22-0400  Submitted:3  Active:1
Progress: Sun, 26 Jul 2015 18:29:45-0400  Submitted:2  Active:1  Finished successfully:1
Progress: Sun, 26 Jul 2015 18:30:12-0400  Submitted:1  Active:1  Finished successfully:2
Progress: Sun, 26 Jul 2015 18:30:35-0400  Stage in:1  Finished successfully:3
Progress: Sun, 26 Jul 2015 18:30:36-0400  Active:1  Finished successfully:3
Progress: Sun, 26 Jul 2015 18:30:58-0400  Stage out:1  Finished successfully:3
Progress: Sun, 26 Jul 2015 18:30:59-0400  Active:1  Finished successfully:4
Final status: Sun, 26 Jul 2015 18:31:02-0400  Finished successfully:5
This produces the following output:
$ ls output/
assemble.err  mandel_0005.err  mandel_0005.out  mandel_0010.jpg  mandel_0015.err  mandel_0015.out  mandel_0020.jpg  mandel.gif
assemble.out  mandel_0005.jpg  mandel_0010.err  mandel_0010.out  mandel_0015.jpg  mandel_0020.err  mandel_0020.out  montage.jpg
The files mandel_NNNN.out and mandel_NNNN.err are the stdout and
stderr from the mandelbrot MPI app. mandel_NNNN.jpg is the
fractal image generated by each invocation of the application. The
file mandel.gif is the animated GIF movie generated, and
montage.jpg is a montage of the generated images.
TODO: the following should be replaced with a new NGINX-based approach.
To see the images, start the webserver application, which is
provided in the part08/bin directory and included in your PATH by
mpi_setup.sh:
$ webserverAs the webserver starts, it prints the port number that it will listen
on. For this tutorial, the port number should be 60000 plus your
"train" login number (the last two digits of your username. I.e., if
you are using train23, your webserver will listen on port 60023.
To see the output go to the following URLs on your browser, being sure to replace the "NN" in 600NN with your training username number. For example:
http://workflow.iu.xsede.org:60023/output/montage.jpg
http://workflow.iu.xsede.org:60023/output/mandel.gif
This concludes the XSEDE tutorial. Please look for further information on Swift at http://swift-lang.org, and join the community via the email lists at http://swift-lang.org/support.
We thank you for your time and interest, and welcome your suggestions for improvements to this tutorial and to Swift!
Example 9: Running an MPI application workflow
In this example we illustrate a simple MPI workflow to calculate PI.
We will be running from the login host of Bridges.
$ cd part09

$ swift -sites mpibridges p9.swift
Swift 0.96.2 git-rev: b9611649002eecd640fc6c58bbb88cb35ce03539 heads/release-0.96-swift 6287
RunID: run002
Progress: Wed, 10 Aug 2016 14:48:37-0400
Progress: Wed, 10 Aug 2016 14:48:38-0400  Submitted:5
Progress: Wed, 10 Aug 2016 14:48:46-0400  Active:5
Progress: Wed, 10 Aug 2016 14:48:52-0400  Active:4  Finished successfully:1
Progress: Wed, 10 Aug 2016 14:48:57-0400  Active:2  Stage out:1  Finished successfully:2
Progress: Wed, 10 Aug 2016 14:48:58-0400  Active:1  Finished successfully:4
Progress: Wed, 10 Aug 2016 14:49:03-0400  Stage out:1  Finished successfully:4
Final status: Wed, 10 Aug 2016 14:49:18-0400  Finished successfully:6
Additional information and references
Mock "science applications" used in the workflow tutorial
This tutorial is based on two trivial example programs,
simulate.sh and stats.sh, (implemented as bash shell scripts)
that serve as easy-to-understand proxies for real science
applications. These "programs" behave as follows.
simulate.sh
The simulation.sh script serves as a trivial proxy for any more complex scientific simulation application. It generates and prints a set of one or more random integers in the range [0-2^62) as controlled by its command line arguments, which are:
$ ./app/simulate.sh --help
./app/simulate.sh: usage:
    -b|--bias       offset bias: add this integer to all results [0]
    -B|--biasfile   file of integer biases to add to results [none]
    -l|--log        generate a log in stderr if not null [y]
    -n|--nvalues    print this many values per simulation [1]
    -r|--range      range (limit) of generated results [100]
    -s|--seed       use this integer [0..32767] as a seed [none]
    -S|--seedfile   use this file (containing integer seeds [0..32767]) one per line [none]
    -t|--timesteps  number of simulated "timesteps" in seconds (determines runtime) [1]
    -x|--scale      scale the results by this integer [1]
    -h|-?|?|--help  print this help
$
All of these arguments are optional, with default values indicated above as [n].
With no arguments, simulate.sh prints 1 number in the range of 1-100. Otherwise it generates n numbers of the form (R*scale)+bias where R is a random integer. By default it logs information about its execution environment to stderr. Here is some examples of its usage:
$ simulate.sh 2>log
       5
$ head -4 log

Called as: /home/wilde/swift/tut/CIC_2013-08-09/app/simulate.sh:
Start time: Thu Aug 22 12:40:24 CDT 2013
Running on node: login01.osgconnect.net

$ simulate.sh -n 4 -r 1000000 2>log
  239454
  386702
   13849
  873526

$ simulate.sh -n 3 -r 1000000 -x 100 2>log
 6643700
62182300
 5230600

$ simulate.sh -n 2 -r 1000 -x 1000 2>log
  565000
  636000

$ time simulate.sh -n 2 -r 1000 -x 1000 -t 3 2>log
  336000
  320000
real    0m3.012s
user    0m0.005s
sys     0m0.006s
stats.sh
The stats.sh script serves as a trivial model of an "analysis" program. It reads N files each containing M integers and simply prints the average of all those numbers to stdout. Similar to simulate.sh it logs environmental information to the stderr.
$ ls f*
f1  f2  f3  f4

$ cat f*
25
60
40
75

$ stats.sh f* 2>log
50
A Summary of Swift in a nutshell
-
Swift scripts are text files ending in
.swiftTheswiftcommand runs on any host, and executes these scripts.swiftis a Java application, which you can install almost anywhere. On Linux, just unpack the distributiontarfile and add itsbin/directory to yourPATH. -
Swift scripts run ordinary applications, just like shell scripts do. Swift makes it easy to run these applications on parallel and remote computers (from laptops to supercomputers). If you can
sshto the system, Swift can likely run applications there. -
The details of where to run applications and how to get files back and forth are described in configuration files that are separate from your script. Swift speaks ssh, PBS, Condor, SLURM, LSF, SGE, Cobalt, and Globus to run applications, and scp, http, ftp, and GridFTP to move data.
-
The Swift language has 5 main data types:
boolean,int,string,float, andfile. Collections of these are dynamic, sparse arrays of arbitrary dimension and structures of scalars and/or arrays defined by thetypedeclaration. -
Swift file variables are "mapped" to external files. Swift sends files to and from remote systems for you automatically.
-
Swift variables are "single assignment": once you set them you can not change them (in a given block of code). This makes Swift a natural, "parallel data flow" language. This programming model keeps your workflow scripts simple and easy to write and understand.
-
Swift lets you define functions to "wrap" application programs, and to cleanly structure more complex scripts. Swift
appfunctions take files and parameters as inputs and return files as outputs. -
A compact set of built-in functions for string and file manipulation, type conversions, high level IO, etc. is provided. Swift’s equivalent of
printf()istracef(), with limited and slightly different format codes. -
Swift’s parallel
foreach {}statement is the workhorse of the language. It can execute all iterations of the loop concurrently. The actual number of parallel tasks executed is based on available resources and settable "throttles". -
Swift conceptually executes all the statements, expressions and function calls in your program in parallel, based on data flow. These are similarly throttled based on available resources and settings.
-
Swift has
ifandswitchstatements for conditional execution. These are seldom needed in simple workflows but they enable very dynamic workflow patterns to be specified.
We will see many of these points in action in the examples below. Lets get started!