Introduction to RCC Hands-on Session
These materials are intended to be used during the hands-on session of the Introduction to RCC workshop.
Exercise 1 Get access to RCC
1.1 Request an Account
Request a user account by completing the applicable form found at http://rcc.uchicago.edu/accounts.
- If you are an eligible Principal Investigator go directly to the PI Account Request form.
- If you are a student, post-doc, or otherwise a member of a UChicago research group, complete the General User Account Request Form.
- RCC will create these accounts during the workshop if possible.
- PIs must acknowledge and approve the request for a user to be added to their projects, so in some cases the activation time will be longer.
1.2 Temporary Accounts
If you do not have an account we can give you temporary access. Let the instructor know you need a temporary account and they will give you a Yubikey. The Yubikey allows you to access guest accounts as indicated in the images below.
Identify your guest username, which is rccguest plus the last four digits of your Yubikey identification number.
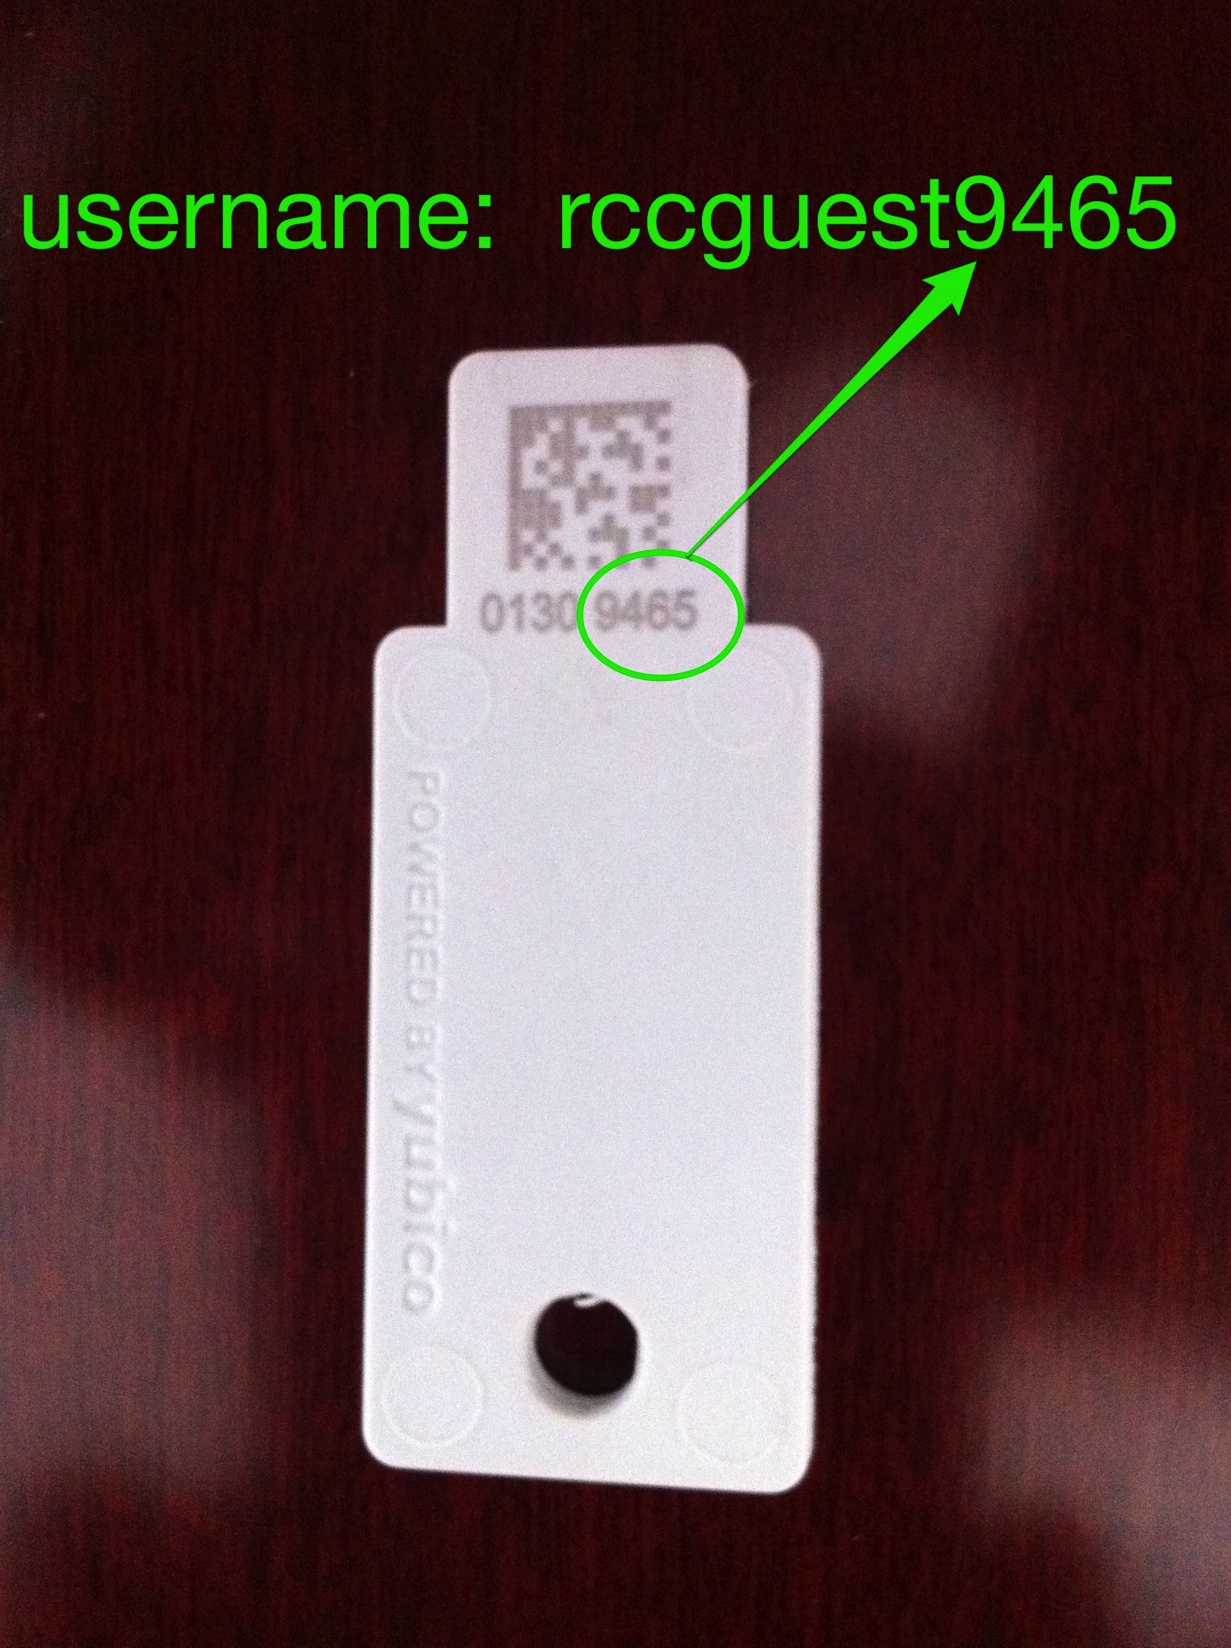
Note the button on the bottom of the Yubikey, which will enter your password when pressed.
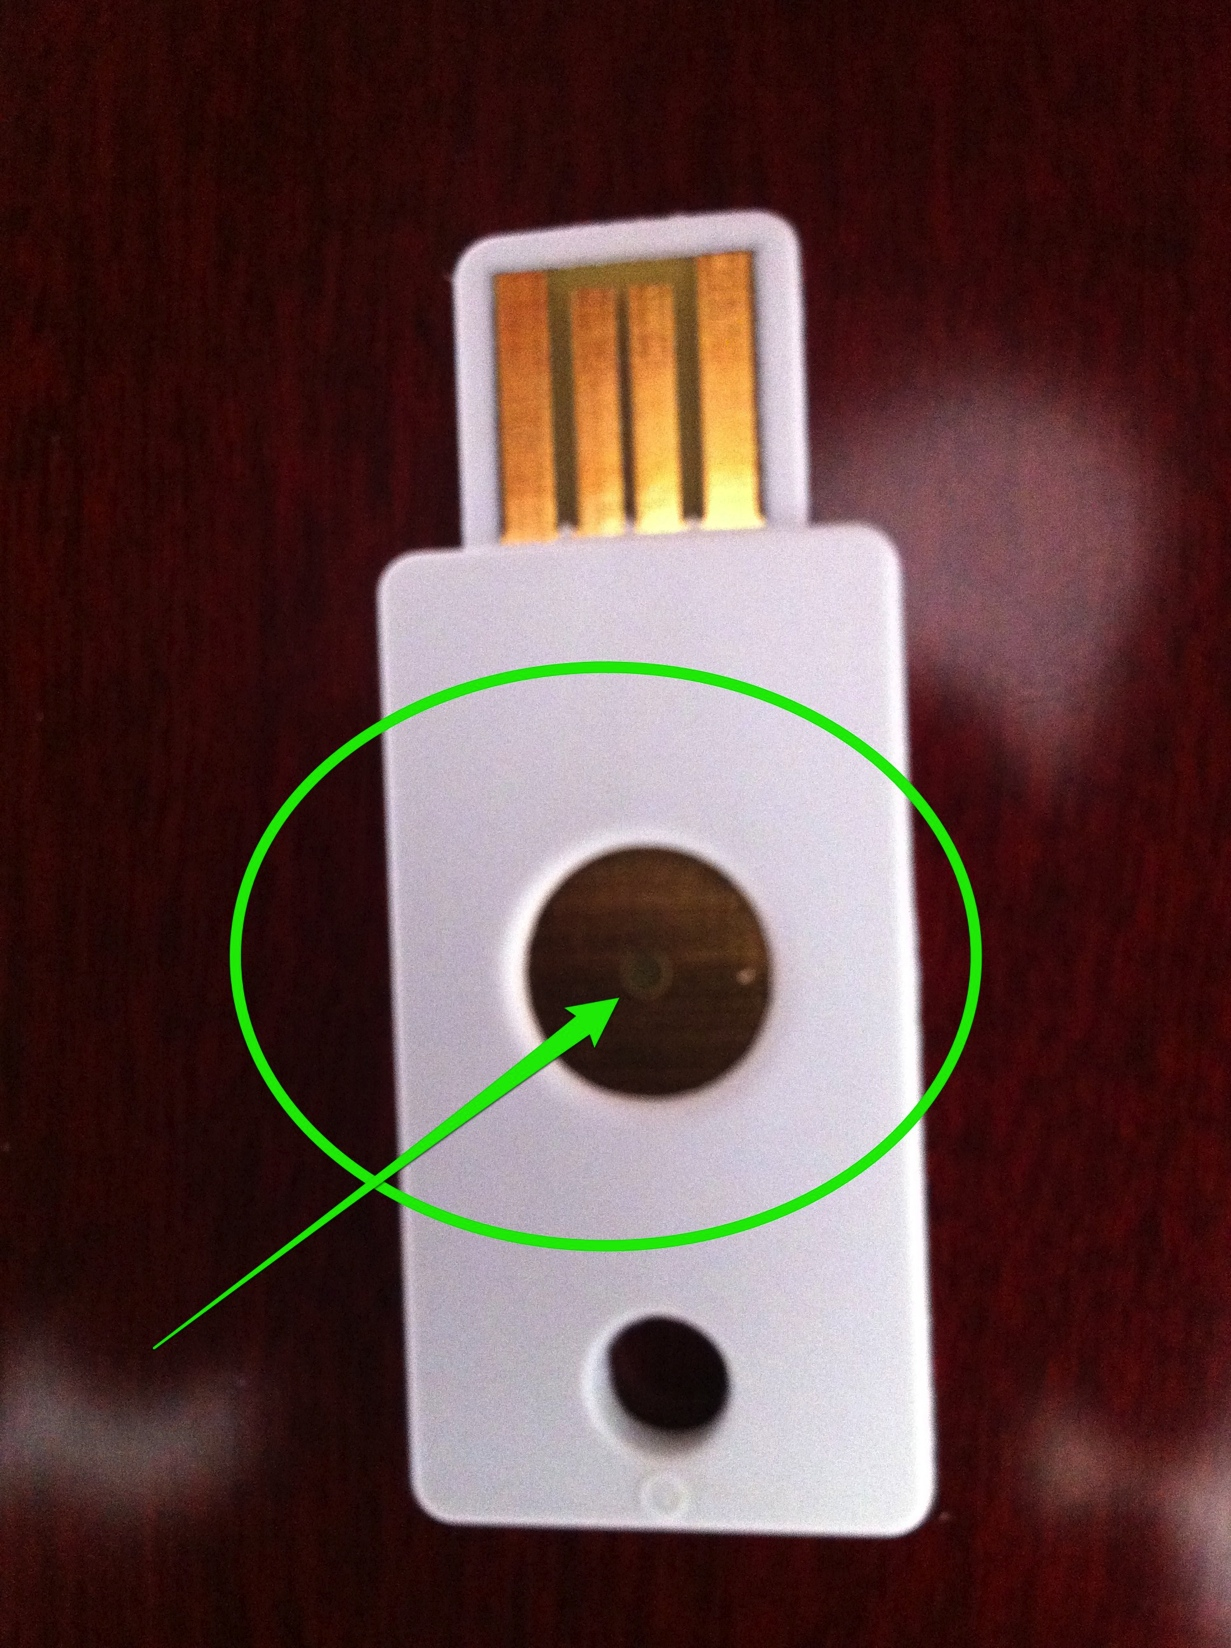
- Insert the Yubikey into a USB slot and ssh to Midway
- Username : rccguest####
- Password : touch the contact
- Let the instructor know if you have trouble.
Exercise 2 Log in to Midway
Access to RCC is provided via secure shell (SSH) login, a tool that allows you to connect securely from any computer (including most smartphones and tablets).
All users must have a UChicago CNetID to log in to any RCC systems. Your RCC account credentials are your CNetID and password:
Username CNetID Password CNetID password Hostname midway.rcc.uchicago.edu
Note
RCC does not store your CNet password and we are unable to reset your password. If you require password assistance, please contact UChicago IT Services.
Most UNIX-like operating systems (Mac OS X, Linux, etc) provide an SSH utility by default that can be accessed by typing the command ssh in a terminal. To login to Midway from a Linux/Mac computer, open a terminal and at the command line enter:
ssh <username>@midway.rcc.uchicago.edu
Windows users will first need to download an SSH client, such as PuTTY, which will
allow you to interact with the remote Unix server. Use the hostname midway.rcc.uchicago.edu
and your CNetID username and password to access the Midway login node.
Exercise 3 Reserve a node to work on interactively
RCC uses the SLURM resource manager to schedule jobs. To request one processor to use interactively, use the sinteractive command with no further options:
sinteractive
Note
We have reserved nodes for use during this workshop. If Midway is under heavy use, include
the option --reservation=intro in your SLURM commands to access nodes reserved for this workshop session. For example:
sinteractive --reservation=intro
The sinteractive command provides many more options for reserving processors. For example, two cores, instead of the default of one, could be reserved for four hours in the following manner:
sinteractive --nodes=1 --ntasks-per-node=2 --time=4:00:00
The option --constraint=ib can be used to ensure that an Infiniband connected node is reserved.
Infiniband is a fast networking option that permits up to 40x the bandwidth of gigabit ethernet on Midway.
Note
Some examples related to MPI/parallel jobs will only work on Infiniband capable nodes. Be sure to reserve use an IB nodes for such exercises below. e.g.,
sinteractive --constraint=ib
Exercise 4 Submit a job to the scheduler
RCC resources are shared by the entire University community. Sharing computational resources creates unique challenges:
- Jobs must be scheduled in a fair manner.
- Resource consumption needs to be accounted.
- Access needs to be controlled.
Thus, a scheduler is used to manage job submissions to the cluster. We use the Slurm scheduler to manage our cluster.
How to submit a job
sinteractive- Gets the specified resources and logs the user onto themsbatch- Runs a script which defines resources and commands
SBATCH scripts contain two major elements. After the #!/bin/bash line, a series of #SBATCH parameters are defined. These are read by the scheduler, SLURM, and relay informaiton about what specific hardware is required to execute the job, how long that hardware is required, and where the output and error (stdout and stderr streams) should be filed. If resources are available the job may start less than one second following submission. When the queue is busy and the resource request is substantial the job may be placed in line with other jobs awaiting execution.
The second major element of an sbatch script is the user defined commands. When the resource request is granted the script is executed just as if it were run interactively. The #SBATCH lines appear as comments to the bash interpreter.
An example sbatch script:
#!/bin/bash
#SBATCH --job-name=test
#SBATCH --output=test.out
#SBATCH --error=test.err
#SBATCH --nodes=1
#SBATCH --ntasks-per-node=1

# load your modules here
module load intel

# execute your tasks here
echo "Hello, world"
date
ls
pwd
hostname
echo "Done with processing"
Copy and modify the script above, then submit it to scheduler a few times. If a reservation
is active for this workshop you can add #SBATCH --reservation=intro to the script
header to ensure that the script run on the reserved nodes. This reservation is not required.
When a scheduled job runs SLURM sets many environmental variables that may be helpful to query from within your job. You can explore the environment variables by adding
env | grep SLURM
to the sbatch script above. The output will be found in the output file(s) defined in your script header.
Exercise 5 Use rcchelp to download, compile, and submit a parallel job
Note
This exercise on an Infiniband capable compute node. See the exercises above for information about how to reserve a compute node to work on interactively.
rcchelp is a custom command-line program to provide online help and code examples. Help on software topics can be accessed with the rccsoftware shortcut. Run this command to see available topics:
rccsoftware
The output should look similar to this:
...
c                   Compile and run a C program []
fftw                Fastest Fourier Transform in the West []
gcc                 Compile and run a C program []
mpi                 Compile and run an MPI program []
namd                Submission script and sample files for NAMD []
...
The left column contains topics that can be passed to the rccsoftware command. Enter:
rccsoftware mpi
into the command line and follow the instructions. Choose Yes when you are given the option
to download files to your home directory. The final output should look like:
The following files were copied locally to:
  /home/$HOME/rcchelp/software/mpi.rcc-docs
  hello.c
  mpi.sbatch
  README
The information that is printed to the screen can be found and reviewed in README file. Follow the instructions to compile and run the parallel Hello World code.
Exercise 6 Target Hardware With Job Submission Scripts
Different types of hardware are usually organized by partition. Rules about job limits such as maximum wallclock time and maximum numbers of CPUs that may be requested are governed by a QOS (Quality of Service). You can target appropriate compute nodes for your job by specifying a partition and a qos in your batch script.
Note
Queue parameters change frequently. Always refer to the official documentation and test your submissions before submitting a large run of jobs.
#SBATCH --exclusive         Exclusive access to all nodes requested, no other jobs may run here
#SBATCH --partition         Specifies the partition (ex: 'sandyb', 'westmere')
#SBATCH --qos               Quality of Service (ex: 'normal', 'debug')
6.1 Specific Configurations
GPU
--gres=gpu:Specifies number of GPUs to useBig Memory - Nodes with >=256G RAM
--partition=bigmemBy default, SLURM allocates 2GB of memory per CPU core being used in a job. This follows from the fact most midway nodes contain 16 cores and 32GB of memory. If your job requires more than the default amount of memory per core, you must include option:–mem-per-cpu=<MB> in your sbatch job script. For example, to use 16 CPU cores and 256GB of memory on a bigmem node the required sbatch flags would be:
--partition=bigmem --ntasks=16 --cpus-per-task=1 --mem-per-cpu=16000Westmere - Not as fast as ‘sandyb’, 12 cores per node (vice 16)
--partition=westmere
At the command prompt, you can run sinfo to get some information about the available partitions, and rcchelp qos to learn more about the qos.
Try to modify a submission script from one of the earlier examples to run on the bigmem partition.
Exercise 7 Interact With Your Submitted Jobs
Submitted jobs status is viewable and alterable by several means. The primary command squeue is part of a versatile system of job monitoring.
Example:
squeue

JOBID PARTITION     NAME     USER  ST       TIME  NODES NODELIST(REASON)
3518933   depablo polyA6.0   ccchiu  PD       0:00      1 (QOSResourceLimit)
3519981   depablo    R_AFM mcgovern  PD       0:00      1 (Resources)
3519987   depablo    R_AFM mcgovern  PD       0:00      1 (Priority)
3519988   depablo    R_AFM mcgovern  PD       0:00      1 (Priority)
3539126       gpu _interac  jcarmas   R      45:52      1 midway231
3538957       gpu test.6.3 jwhitmer   R      58:52      1 midway230
3535743      kicp Alleturb   agertz  PD       0:00      6 (QOSResourceLimit)
3535023      kicp hf.b64.L   mvlima   R    5:11:46      1 midway217
3525370  westmere phase_di   khaira   R    4:50:02      1 midway008
3525315  westmere phase_di   khaira   R    4:50:03      1 midway004
3525316  westmere phase_di   khaira   R    4:50:03      1 midway004
The above tells us:
Name Description JOBID Job ID #, unique reference number for each job PARTITION Partition job will run on NAME Name for the job, defaults to slurm-JobID USER User who submitted job ST State of the job TIME Time used by the job in D-HH:MM:SS NODES Number of Nodes consumed NODELIST(REASON) List of Nodes consumed, or reason the job has not started running
squeue’s output is verbose, but also customizable
Example:
squeue --user CNet -i 5
The above will only show information for user CNet and will refresh every 5 seconds
7.1 Canceling Jobs
Cancel a job:
scancel <JobID>
or cancel all of your jobs at the same time:
scancel --user <CNetID>
7.2 More Job Information
More information about a submitted job can be obtained through the scontrol command by specifying a JobID to query:
scontrol show job <JobID>
Example:
scontrol show job 3560876

JobId=3560876 Name=sleep
 UserId=dylanphall(1832378456) GroupId=dylanphall(1832378456)
 Priority=17193 Account=rcc-staff QOS=normal
 JobState=CANCELLED Reason=None Dependency=(null)
 Requeue=1 Restarts=0 BatchFlag=0 ExitCode=0:0
 RunTime=00:00:10 TimeLimit=1-12:00:00 TimeMin=N/A
 SubmitTime=2013-01-09T11:39:40 EligibleTime=2013-01-09T11:39:40
 StartTime=2013-01-09T11:39:40 EndTime=2013-01-09T11:39:50
 PreemptTime=None SuspendTime=None SecsPreSuspend=0
 Partition=sandyb AllocNode:Sid=midway-login2:24907
 ReqNodeList=(null) ExcNodeList=(null)
 NodeList=midway113
 BatchHost=midway113
 NumNodes=1 NumCPUs=1 CPUs/Task=1 ReqS:C:T=*:*:*
 MinCPUsNode=1 MinMemoryNode=0 MinTmpDiskNode=0
 Features=(null) Gres=(null) Reservation=(null)
 Shared=OK Contiguous=0 Licenses=(null) Network=(null)
 Command=/bin/sleep
 WorkDir=/scratch/midway/dylanphall/repositories/pubsw/rccdocs.sphinx
Exercise 8 Explore the Module System
The module system is a script based system to manage the user environment.
Why isn’t everything installed and available by default? The need for
- multiple versions of software (version number, addons, custom software) and
- multiple build configurations (compiler choice, options, and MPI library)
would lead to hoplessly polluted namespace and PATH problems. Additionally, most of the applications used on HPC machines are research codes in a constant state of development. Testing, stability, compatibility, and other usability concerns are often not a primary consideration of the authors.
Try running the commands below and review the output to learn more about the module system.
Basic module commands:
Command Description module avail [name] lists modules matching [name] (all if ‘name’ empty) module load [name] loads the named module module unload [name] unloads the named module module list lists the modules currently loaded for the user
8.1 Example - Find and load a particular Mathematica version
Obtain a list of the currently loaded modules:
$ module list

Currently Loaded Modulefiles:
1) slurm/2.4       3) subversion/1.6  5) env/rcc         7) tree/1.6.0
2) vim/7.3         4) emacs/23.4      6) git/1.7
Obtain a list of all available modules:
$ module avail

-------------------------------- /software/modulefiles ---------------------------------
Minuit2/5.28(default)                               intelmpi/4.0
Minuit2/5.28+intel-12.1                             intelmpi/4.0+intel-12.1(default)
R/2.15(default)                                     jasper/1.900(default)
...
ifrit/3.4(default)                                  x264/stable(default)
intel/11.1                                          yasm/1.2(default)
intel/12.1(default)
------------------------- /usr/share/Modules/modulefiles -------------------------------
dot         module-cvs  module-info modules     null        use.own
----------------------------------- /etc/modulefiles -----------------------------------
env/rcc            samba/3.6          slurm/2.3          slurm/2.4(default)
--------------------------------------- Aliases ----------------------------------------
Obtain a list of available versions of a particular piece of software:
$ module avail mathematica

----------------------------------------------------------------------------------------
mathematica/8.0(default)            mathematica/9.0
----------------------------------------------------------------------------------------
Load the default mathematica version:
$ module load mathematica

$ mathematica --version
8.0
List the currently loaded modules:
$ module list

Currently Loaded Modulefiles:
 1) slurm/2.4       3) subversion/1.6  5) env/rcc         7) tree/1.6.0
 2) vim/7.3         4) emacs/23.4      6) git/1.7         8) mathematica/8.0
Unload the mathematica/8.0 module and load mathematica version 9.0
$ module unload mathematica/8.0

$ module load mathematica/9.0

$ mathematica --version
9.0
List the currently loaded modules:
$ module list

Currently Loaded Modulefiles:
 1) slurm/2.4       3) subversion/1.6  5) env/rcc         7) tree/1.6.0
 2) vim/7.3         4) emacs/23.4      6) git/1.7         8) mathematica/9.0
Exercise 9 Learn About Your Storage
There are three different types of storage:
- Home - for personal configurations, private data, limited space
/home/[user name] - Scratch - fast, for daily use
/scratch/midway/[user name] - Project - for common project files, project data, sharing
/project/[PI name]
To find the limits enter:
quota

Disk quotas for user dylanphall:
Filesystem       type          used     quota     limit      files    grace
----------       -------- --------- --------- --------- ---------- --------
home             USR         2.90 G   10.00 G   12.00 G      39987     none
midway-scratch   USR        24.26 G    5.00 T    6.00 T     106292     none
project-abcdefg  FILESET    24.33 G  500.00 G  550.00 G       5488     none
Descriptions of the fields:
-
Filesystem This is the file system or file set where this quota is valid.
-
type This is the type of quota. This can be USR for a user quota, GRP for a group quota, or FILESET for a file set quota. File set quotas can be considered a directory quota. USR and GRP quotas can exist within a FILESET quota to further limit a user or group quota inside a file set.
-
used This is the amount of disk space used for the specific quota.
-
quota This is the quota or soft quota. It is possible for usage to exceed the quota for the grace period or up to the hard limit.
-
limit This is the limit or hard quota that is set. It is not possible for usage to exceed this limit.
-
files This is the number of files currently counted in the quota.
-
grace This is the grace period which is the amount of time remaining that the quota can be exceeded. The value none means that the quota is not exceeded. After the quota has been exceeded for longer than the grace period, it will no longer be possible to create new files.
Default Storage:
Partition Available Home 25 G Scratch 5 T Project 500 G
9.1 Explore File Backups & Restoration
Snapshots
Automated snapshots of the Home and Project areas are available in case of accidental file deletion or other problems. Currently snapshots are available for these time periods:
- 4 hourly snapshots
- 7 daily snapshots
- 4 weekly snapshots
You can find snapshots in these directories:
/snapshots/home/– Home snapshots/snapshots/project– Project snapshots
The subdirectories within these locations specify the time of the backup.
For example, /snapshots/project/daily-2013-10-08.05h15/project/rcc contains
an exact snapshot of the contents of /project/rcc as it appeared on October 10, 2013 at 5:15 am.
Try recovering a file from a snapshot of your home directory. If you are a brand new RCC user, or using a guest account, you may not have any snapshots of your home as it has not existed for long enough.
Backup
Backups are performed on a nightly basis to a tape machine located in a different data center than the main storage system. These backups are meant to safeguard against disasters such as hardware failure or events that could cause the loss of the main data center. Users should make use of the snapshots described above to recover files.
Exercise 10 Run a community code
Computing centers usually maintain the most popular community codes in a central repository. The physical and biological sciences in particular have a wealth of codes for simulating the natural world at a variety of scales. NAMD is an example of a code that can be run on hundreds of thousands of processors in order to study atomistic protein dynamics. Enter the command rcchelp namd and follow the instructions to download sample files and submission scripts. Run the parallel NAMD job.
Exercise 11 Putting it all together
Develop a simple application, compile it, and submit it to the scheduler to run. If you are not sure what to write and compile, try this simple C application:
include <stdio.h>

int main( void ) {
    printf("Hello, World!\n");
    return 0;
}
Try compiling with both the GCC and Intel compilers. You will need to use the commands module load gcc and module load intel.
Exercise 12 Connect to the cluster with Samba
Samba allows uses to connect to (or “mount”) their home and project directories on their local computer so that the file system on Midway appears as if it were directly connected to the local machine. This method of accessing your RCC home and project space is only available from within the UChicago campus network. From off-campus you will need to connect through the UChicago virtual private network.
Your Samba account credentials are your CNetID and password:
Username: ADLOCAL\<CNetID>
Password: CNet password
Hostname: midwaysmb.rcc.uchicago.edu
Note
Make sure to prefix your username with ADLOCAL\
On a Windows computer, use the “Map Network Drive” functionality and the following UNC paths:
Home:    \\midwaysmb.rcc.uchicago.edu\homes
Project: \\midwaysmb.rcc.uchicago.edu\project
On a Mac OS X, use these URLs to connect:
Home:    smb://midwaysmb.rcc.uchicago.edu/homes
Project: smb://midwaysmb.rcc.uchicago.edu/project
To connect on a Mac OS X computer you can either click the above URLs or follow these steps:
- Use the Connect to Server utility in Finder

- Enter one of the URLs from above in the input box for Server Address.
- When prompted for a username and password, select Registered User.
- Enter
ADLOCAL\userfor the username and enter your CNet password.
On Ubuntu, use these URLs to connect:
Home:    smb://midwaysmb.rcc.uchicago.edu/<CNetID>
Project: smb://midwaysmb.rcc.uchicago.edu/project
- Use the Connect to Server utility in the File Manager
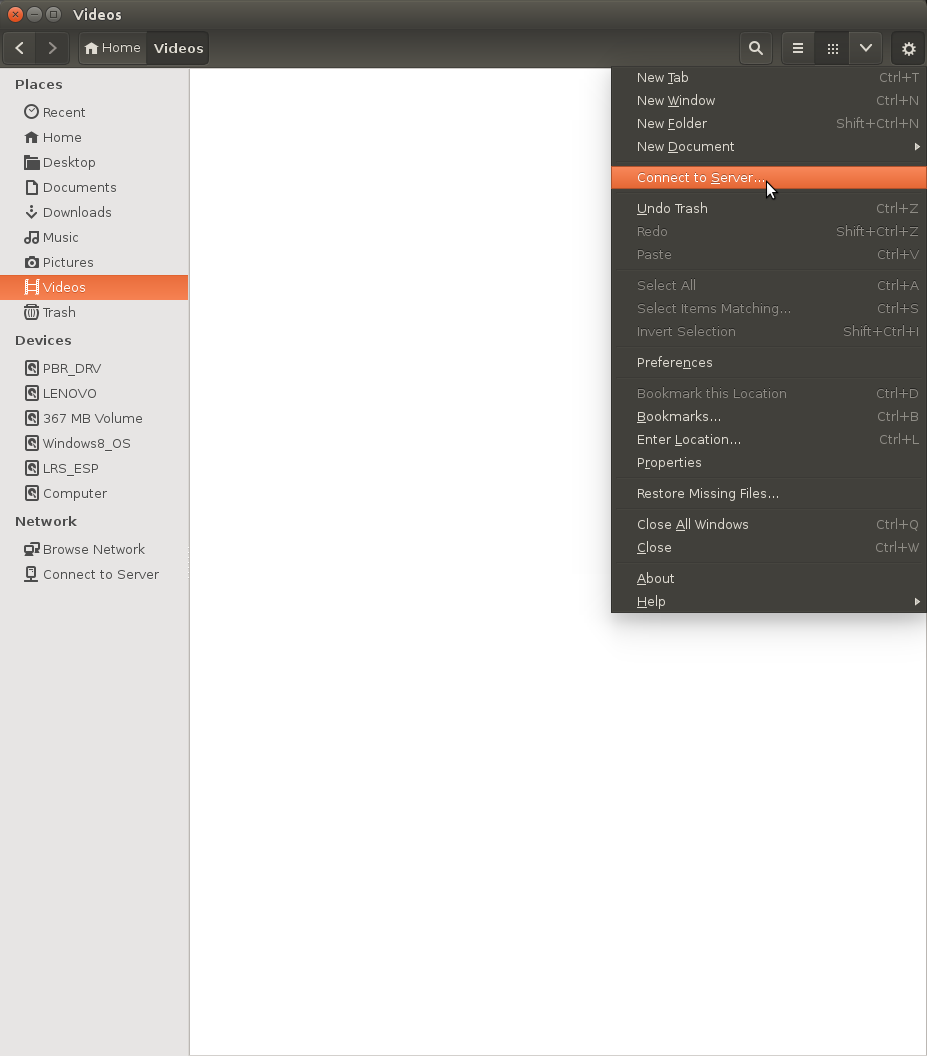
- Enter one of the above URLs for Server Address.
- Enter
ADLOCAL\userfor the username and enter your CNet password.
Exercise 13 Head to the User’s Guide
You are ready to work from the User’s Guide. Head to http://docs.rcc.uchicago.edu to get started. You may want to try:
- Requesting a user or PI account
- Connecting with NX, to get a graphical Linux desktop connect to the cluster
- Using Sviz, for demanding graphical applications that run on the cluster
- Transferring data to the cluster
- Running jobs
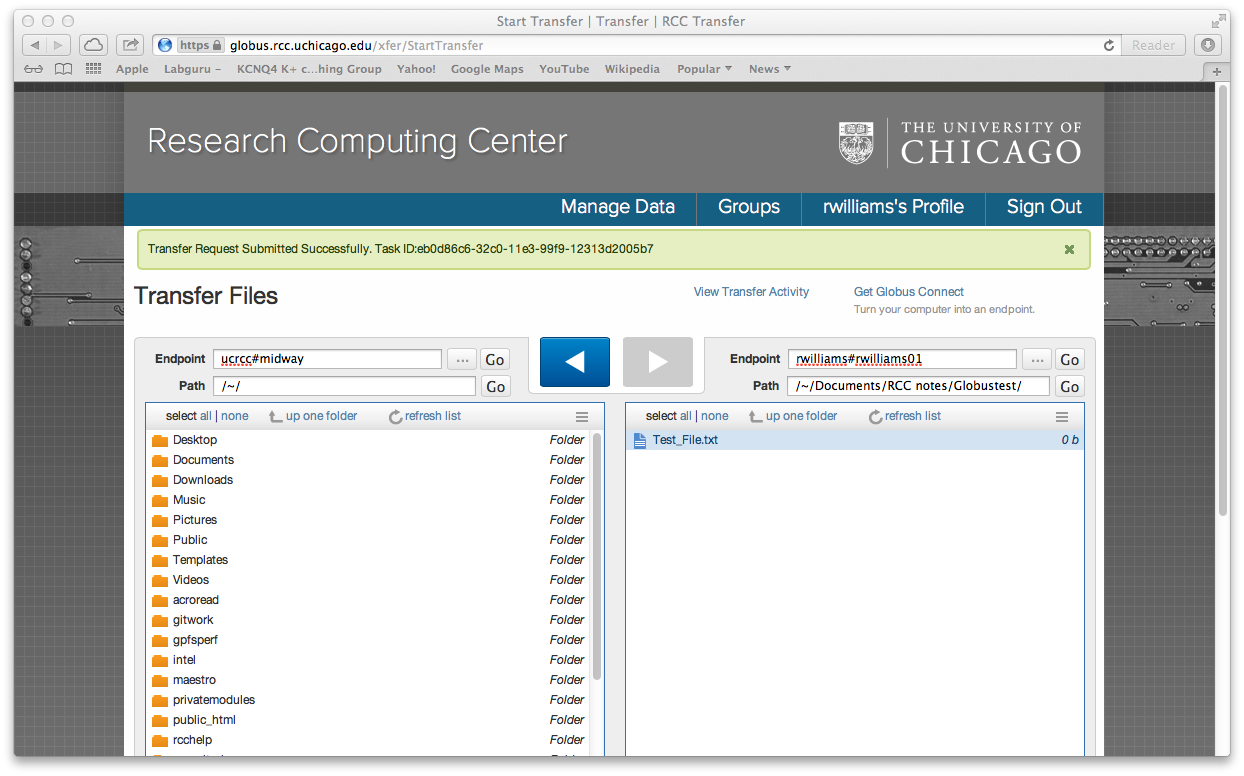
Exercise 14 Transfer files with Globus Online
- Go to https://globus.rcc.uchicago.edu and follow the instructions to sign in to your Globus Online account (http://docs.rcc.uchicago.edu/user-guide.html#user-guide-globus-online).
- Once you have signed in, enter ucrcc#midway as the Endpoint then click the Go button.
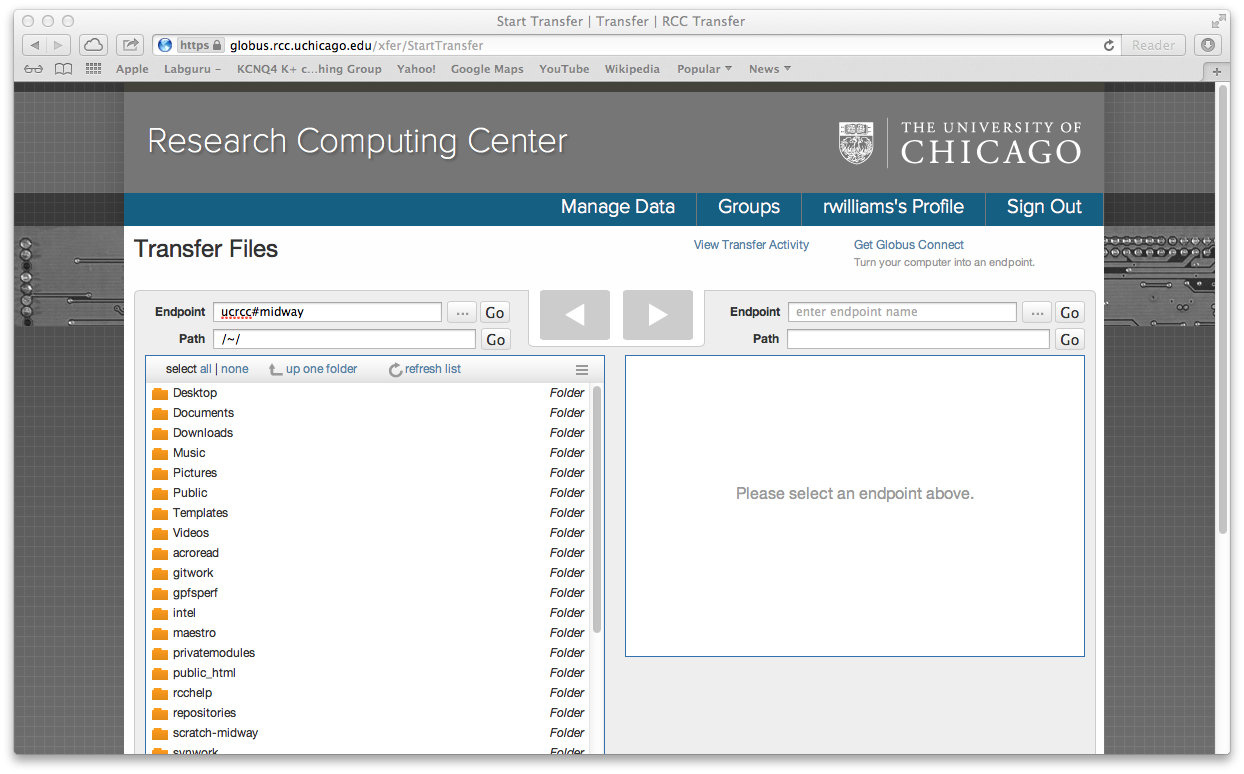
- Click the Get Globus Connect link on the transfer page and follow the installation instructions. The Endpoint Name you create in Step Two will refer to your local computer.
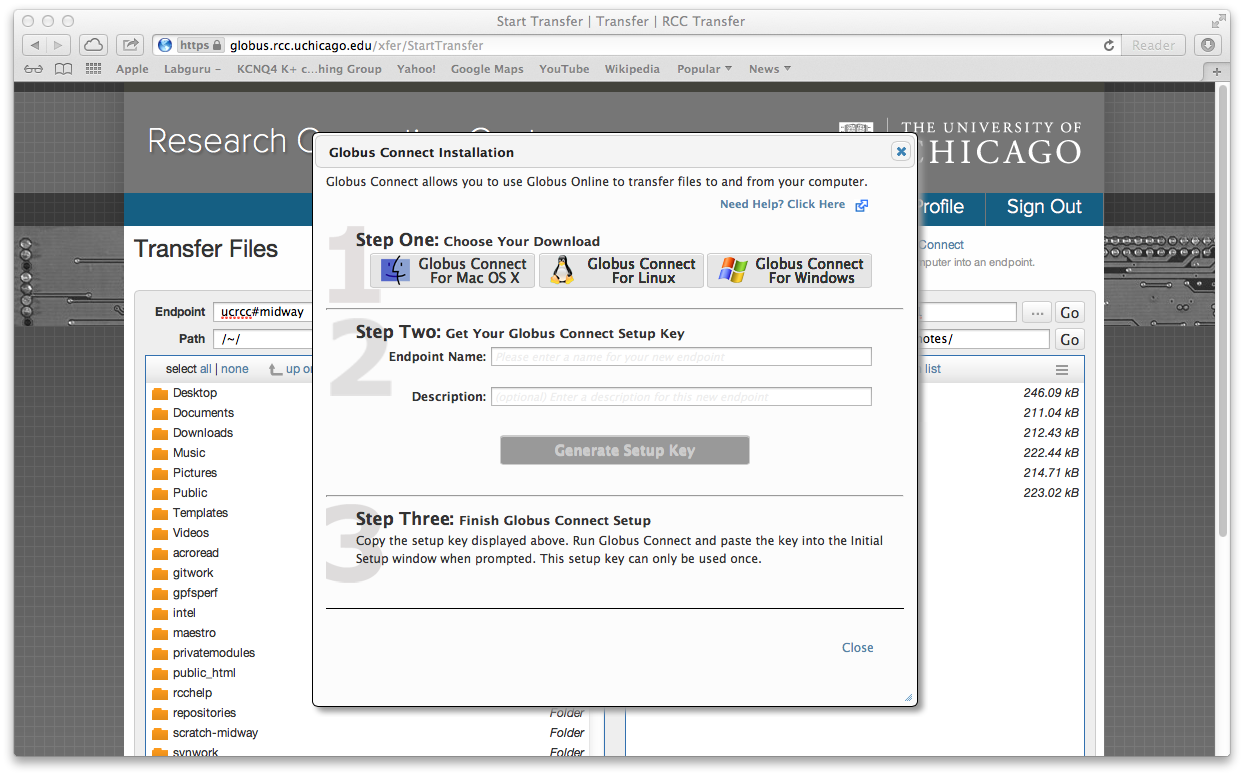
- Open Globus Connect on your local computer
- Return to the transfer page, enter your local computer’s endpoint name in the second Endpoint field, then click the Go button.

- Find a file within your local endpoint window, select it, then click the opposing arrow to transfer it to your Midway home directory. Click refresh list to view the transferred file.